2 de January de 2025
Velocity Based Training VBT GUIDES
Velocity Based Training 【 #1 VBT Guide in the World 】
We know you’ve come this far because you’re interested in learning how to train in the most efficient way, achieving the best results, and enhancing your performance as an athlete. That’s why we’ve created the world’s largest Velocity Based Training guide.
In this guide, you’ll find all the information you need to reach your goals. Keep reading to discover how to maximize your potential with VBT.
Introduction to Velocity Based Training
In Vitruve, we want to welcome you to the best Velocity Based Training guide, the best system currently available for improving athletes’ performance and reducing the risk of injury in the gym. The results of this system are supported by hundreds of scientific research studies from prestigious organizations and institutions.
Throughout the guide, we will explain all the concepts and techniques that form the basis of this method. Its main value lies in enabling each individual to achieve the highest possible performance in their training sessions. It doesn’t matter if you’re unfamiliar with Velocity Based Training; this guide is designed to teach anyone how to fully implement it in training sessions with athletes.
Furthermore, we want to emphasize that this guide is highly practical, not solely focused on theory. It incorporates all the knowledge we’ve gained over the years through real-life examples. While theory provides the foundation for any training method, it’s crucial that we know how to put it into practice.
Therefore, we will also teach you the correct way to apply it, regardless of the number of athletes you are coaching or the type of sport they are involved in.
We have thousands of clients worldwide who already use VBT, applying it across different work disciplines and various sports. This allows us to gather an impressive volume of data and discover numerous correlations that accelerate our learning across a wide range of topics. This information is incredibly valuable for enhancing the application of Velocity Based Training in a real-world setting.
As we believe that all the information provided in this guide is genuinely valuable, upon completion, you can request a certificate confirming that you have completed the course and acquired the necessary knowledge to implement Velocity Based Training with your athletes. While not professionally accredited, it will serve as your personal assurance that you have learned all the essential concepts in this field.

What’s Velocity Based Training?
Velocity Based Training, or VBT, consists in applying the maximum force possible against any load. Contrary to what many people believe, it’s not a specific program or training routine, nor is it about lifting weights at very high speeds. Instead, Velocity Based Training it’s an objective methodology to understand what’s happening in an athlete’s body while they’re lifting weights, regardless of the training program, routine, or plan being followed.
It’s a method that addresses all the challenges encountered with traditional planning methods. For instance, the difficulty many individuals face in determining the appropriate number of repetitions or the right amount of weight to put on the barbell.
To address this, Velocity Based Training is applied allowing relevant data to be gathered in order to make real-time adjustments to an athlete’s training plan. This is the only way to ensure they’re adhering to the intended program. In a sense, working without VBT is like working blindfolded, as we can’t truly understand what’s happening or exert control over athletes’ actions.
For instance, in soccer, GPS devices are commonly used. These devices worn by players during training allow the fitness coach to track metrics such as the distance each athlete runs, the number of sprints performed, or the count of ball passes completed. This way, valuable information can be collected about each athlete’s actual workload, and it can be adjusted based on their fatigue levels at specific times, thereby enhancing athletes’ performance and reducing the risk of injuries.

In other sports like cycling, we can also come across similar devices such as the potentiometer. These sensors provide information about the force and power that the cyclist applies to the bike. They are commonly used to train within specific power zones, allowing the training to be adapted to the athlete’s physical conditions in each session, aiming to optimize it as much as possible.

Who Can Benefit From Velocity Based Training?
It’s evident that any athlete will benefit from performing strength exercises in the gym, but even more so when done correctly with VBT. This modern approach takes into account the individual characteristics of each person when planning training sessions, tailoring them completely to their physical qualities and the goals they aim to achieve. And it’s precisely this that allows athletes to achieve astonishing results.
It’s a method that can benefit any athlete, even those who might not seem to have significant strength requirements, such as marathon runners. In fact, VBT has been shown to help improve performance in these types of competitions.
In fact, we invite you to check out Vitruve’s Instagram, where you’ll find numerous posts from other clients that we’ve shared, showing them applying this method with their athletes and themselves. If you have any doubts, you can consult them.
However, it’s not just athletes who can benefit from this approach. People in the realm of health, such as physiotherapists, can also benefit. They are using this methodology to monitor the exercises they prescribe to their patients, ensuring that the prescribed exercises are suitable and that the workload assigned is optimal for each patient. Additionally, this approach is being implemented in some hospitals, where research is being conducted on how well-controlled strength training can significantly improve various conditions and diseases.
Most Common Errors of Strength Training
Currently, there are several fundamental mistakes that coaches make during training sessions with their athletes, which ultimately hinder their progress. Moreover, in certain cases, they’re increasing the risk of injury. This is closely tied to the fact that they’re not tailoring each athlete’s training in real-time.
It’s important to note that the traditional planning approach might not yield the same results for every individual. For instance, one person might advance while another remains stagnant.
What are the primary issues that can arise from this training methodology?
1. Difficulties When Estimating 1RM
Traditionally, what has been done is to conduct a 1RM test to determine an individual’s maximum strength based on the maximum weight they can lift for one repetition. This figure is then used as a reference to plan the exercises that will be performed in the following weeks. Let’s say someone has a 1RM of 100 kg; if they’re scheduled to train at 90% intensity the next week, they would load 90 kg on the barbell, and so on.
The problem with this method is that the 1RM value can fluctuate from day to day due to various factors such as fatigue, lack of sleep, or motivation level. This means that if we rely solely on a single day with a very high 1RM as a reference, on a day when our 1RM is lower, we might struggle to complete the training session. Moreover, this approach can have detrimental effects, including increased fatigue or a higher risk of injury.
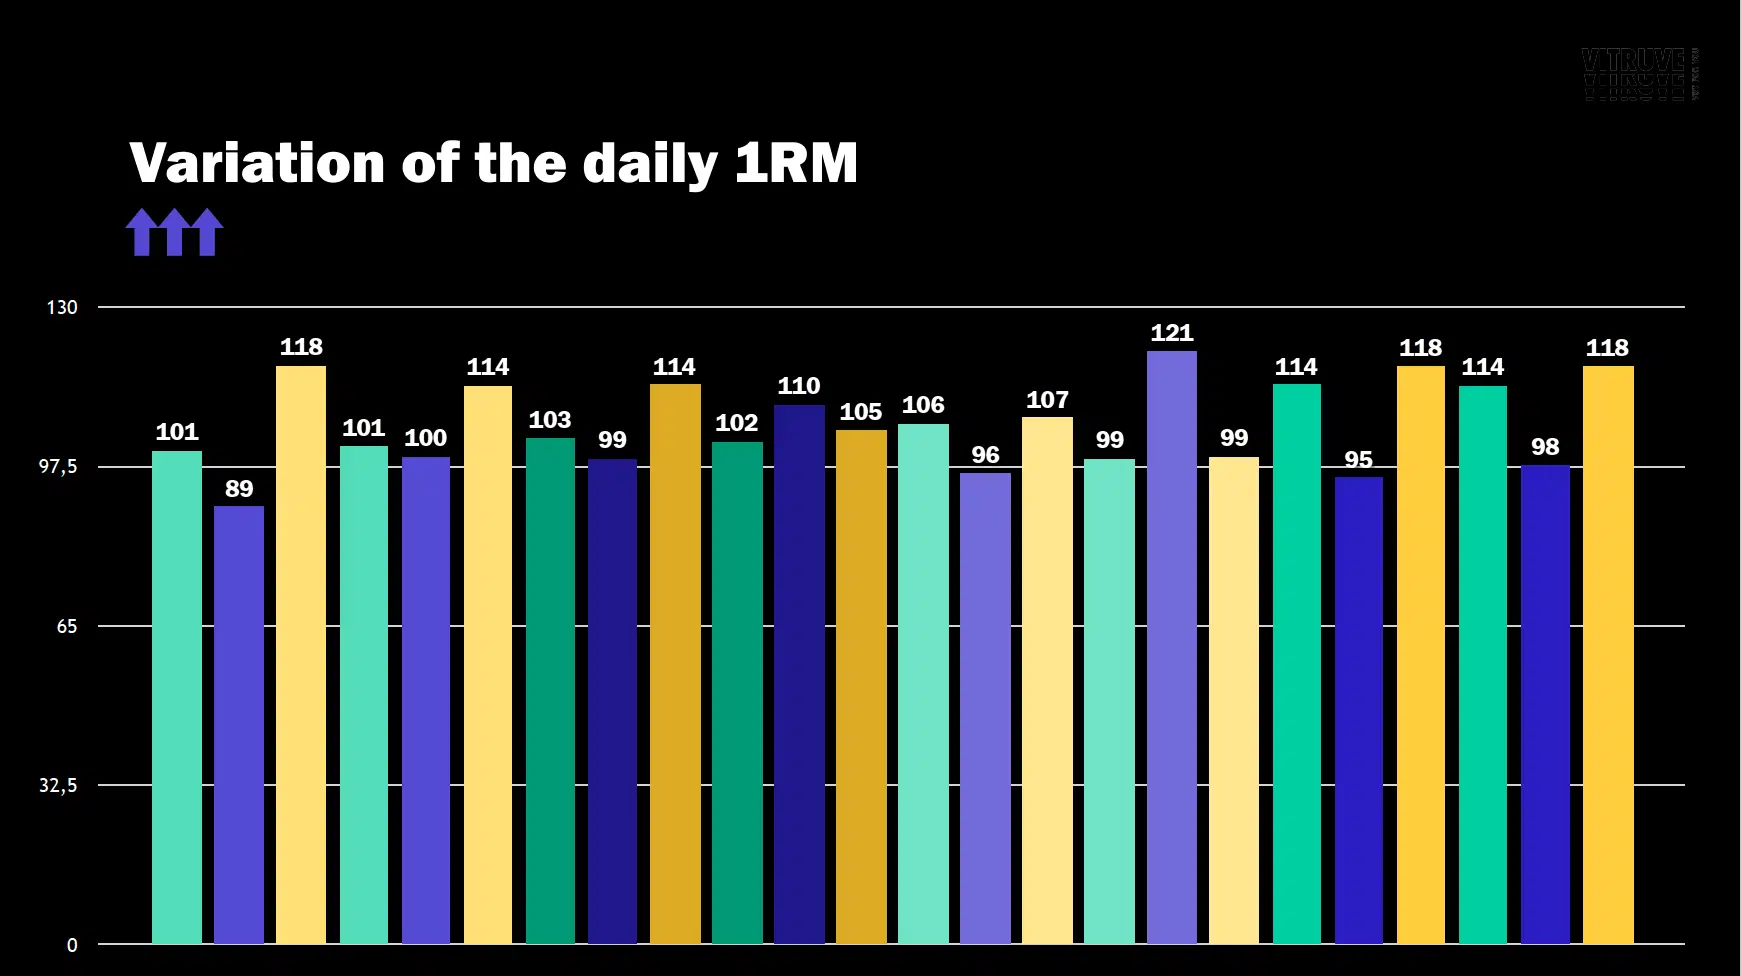
Therefore, this methodology is not valid, as we can’t predict an individual’s strength on a daily basis. Taking this into consideration, the ideal scenario would be to know their daily 1RM. However, the drawback is that conducting a 1RM test every day is impractical. It’s a complex task to execute correctly unless we’re experts, and since this test involves lifting the maximum weight we can handle, there’s a risk of injury. Furthermore, it’s highly unlikely that athletes like soccer players or tennis players, for example, would need to perform a 1RM test.
For this reason, other coaches employ an nRM test, which entails assessing the number of repetitions their athletes can perform with a specific weight before reaching failure. Based on this data, they calculate the 1RM. Nevertheless, this approach has the disadvantage of requiring athletes to reach failure, which can lead to exhaustion and has been shown to be detrimental to physical performance. In fact, it can even hinder progress.
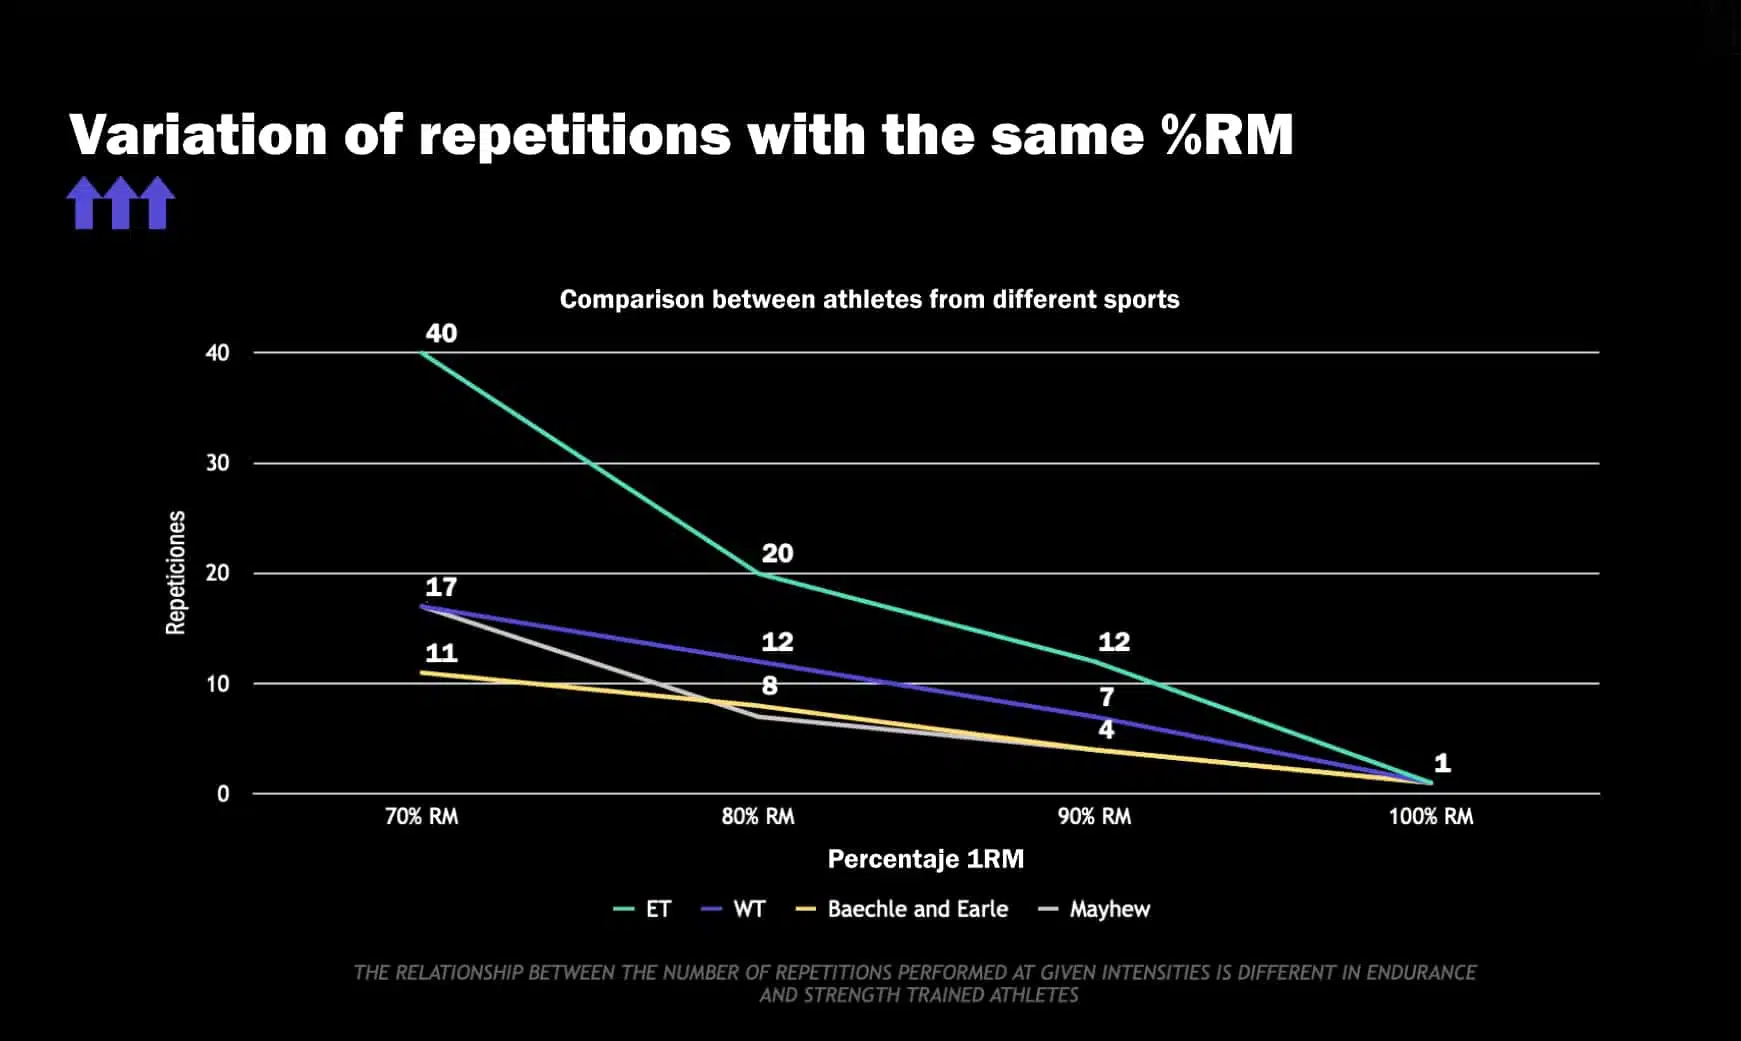
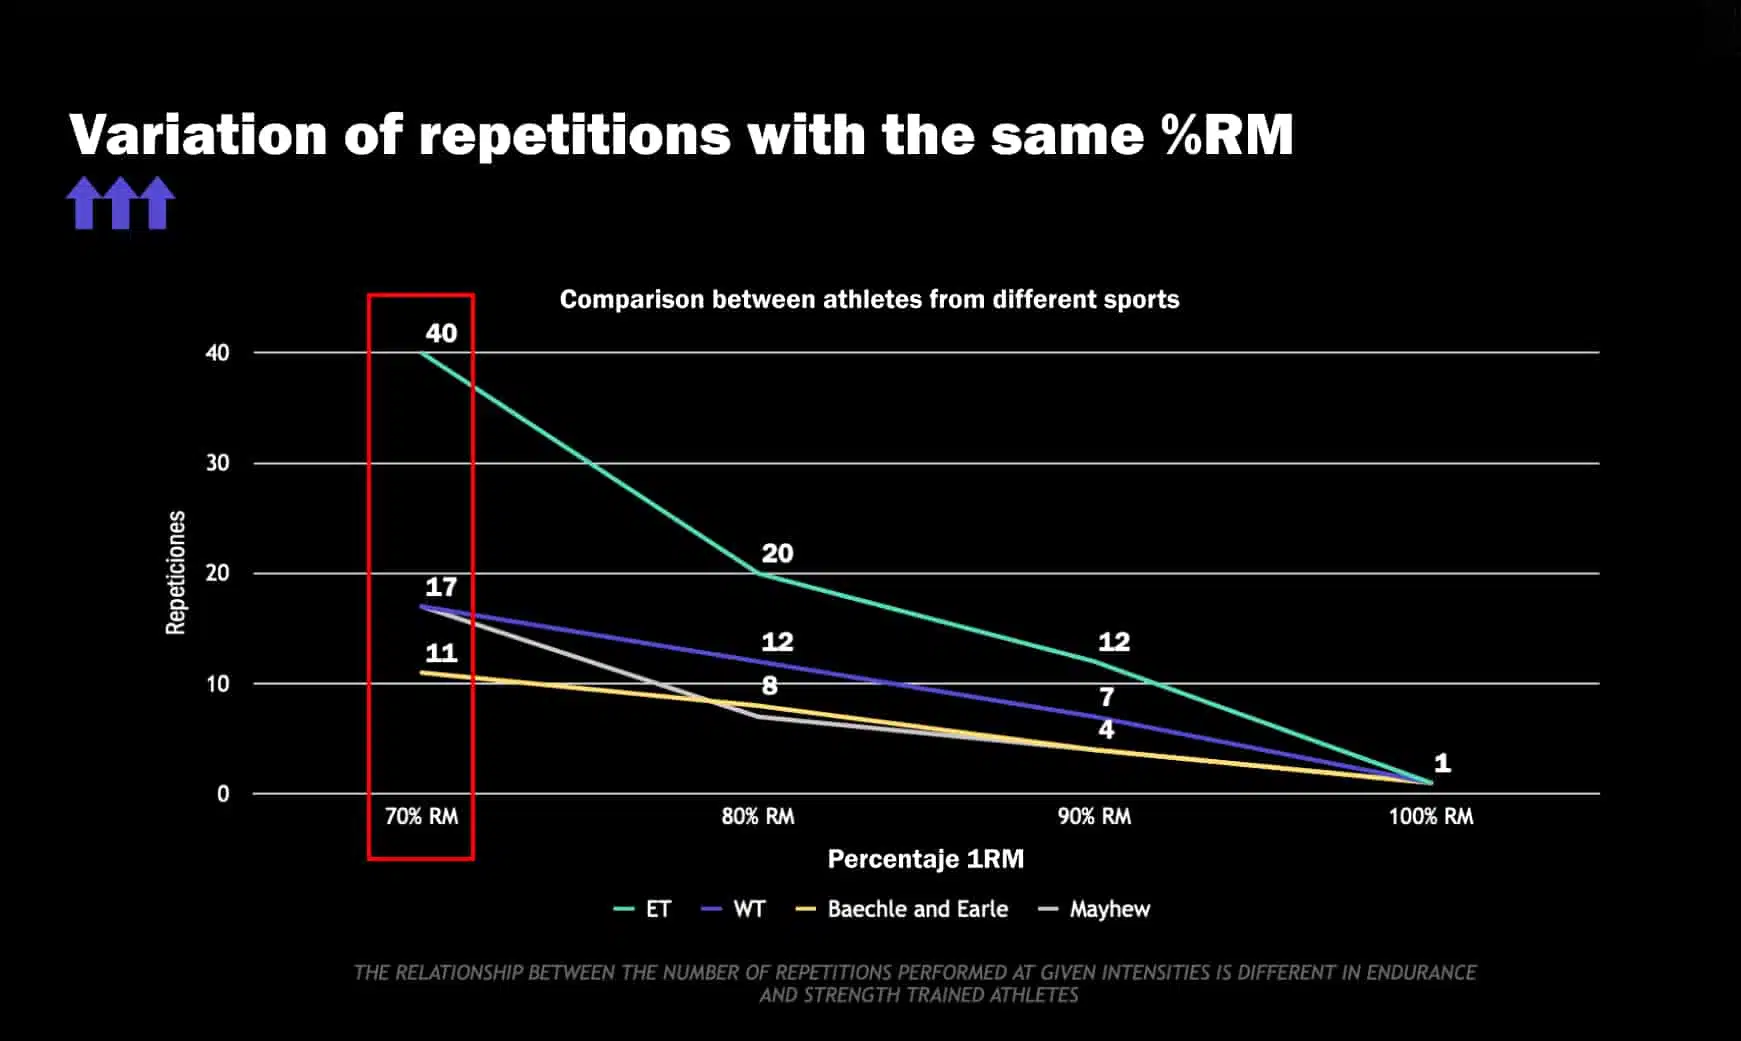
On the other hand, it’s important to consider that with the same percentage of their own 1RM, two athletes can perform a different number of repetitions before reaching failure. Fatigue sets in differently because the degree of effort varies as well.
2. Difficulties When Setting a Number of Reps
Is there an ideal number of repetitions? No, there isn’t. There are days when the athlete is stronger than usual and can perform the prescribed repetitions with ease, while on other days, the effort required might be much greater. It’s not sensible for the athlete to become excessively fatigued or even approach failure.
Furthermore, depending on the type of sport being practiced, athletes performing the same percentage of their 1RM can complete a different number of repetitions compared to those engaged in different activities.
This implies that a generic number of repetitions should not be programmed for all athletes. The optimal approach is to individualize it in real-time for each athlete to achieve the greatest strength gains and adaptations with the least training required.
3. Difficulties When Performing Effective Reps
This is one of the most common issues we encounter in strength training. The difference between merely going through the motions of a repetition and performing it with intention is substantial. This problem has a straightforward solution through a few small changes that we’ll discuss later. Even without altering the training plan, these changes have a highly positive impact on the athlete’s motivation and performance.
Keep in mind that many athletes, such as soccer players, tennis players, or basketball players, for instance, go to the gym out of obligation—either because their fitness coach has prescribed it or because they recognize its benefits for their activity. As a result, since it’s not their primary focus, they often attend without much motivation and follow the program assigned by their coach.
The issue is that merely completing the routine isn’t sufficient. The way each repetition is performed makes a difference in terms of performance. Lifting a weight slowly doesn’t yield the same results as applying maximum power. In the latter case, we can improve our 1RM by twice the weight, as shown in the study below. This approach increases the intensity of the lift and applies much greater force to the bar.
Therefore, regardless of the training program being followed, the athlete’s intention should always be to lift the weight explosively, as fast as possible. Naturally, this requires extra effort, and if the athlete isn’t fully aware that they should do this with each repetition, they might forget, ultimately limiting their progress.
How to Estimate 1RM With Velocity
As we’ve seen before, knowing an athlete’s 1RM is crucial for adjusting the load that needs to be placed on the barbell to train with the programmed RM percentage. This value fluctuates each day based on factors like nutrition, sleep quality, and motivation. Therefore, it doesn’t make sense to perform a 1RM test on a single day and plan the subsequent training sessions based on it, as it can change the next day.
The ideal way to adjust training load is by knowing the athletes’ daily 1RM. However, conducting daily 1RM tests isn’t feasible due to the risk of injury or fatigue. Furthermore, performing 1RM tests would be detrimental for athletes whose sport isn’t specifically weightlifting, such as soccer players, basketball players, tennis players, and others. They aren’t adapted to such high loads, and it’s also unnecessary for their respective sports.
Nonetheless, knowing the 1RM can be incredibly useful for precisely adjusting loads—such as 40%, 60%, or 80%, for instance. But how can we determine the daily 1RM without having to lift the weight directly?
How To Calculate An Athlete’s 1RM Daily?
According to a research conducted by González Badillo and Sánchez Medina in 2010, there’s a direct correlation between the speed at which we can lift a given weight and the intensity relationship. Naturally, the speed will be higher when lifting the barbell empty, without any weight, compared to lifting a load of 110 lb or 220 lb, for instance. The same pattern continues as the weight increases, causing the lift to become significantly slower. Upon reaching the 1RM, which is the maximum weight that can be lifted, the barbell moves at the slowest speed at which we can lift a weight.
Hence, there’s a close correlation between speed and the increase in weight. In an ideal scenario, the correlation would be 100%. As more weight is added to the barbell, the speed decreases, reaching its lowest point at the 1RM.
The study concluded that, although there are always individuals who deviate from the average ranges, nearly all people move approximately the same percentage of 1RM at the same speed. For instance, within the selected group, the majority of participants moved 35% of the 1RM at 1.21 meters per second, with differences of ±0.07 meters per second. They moved 60% of the 1RM at 0.8 meters per second and 100% of the 1RM at 0.19 meters per second. This clearly demonstrates a direct relationship between speed and the percentage of RM.
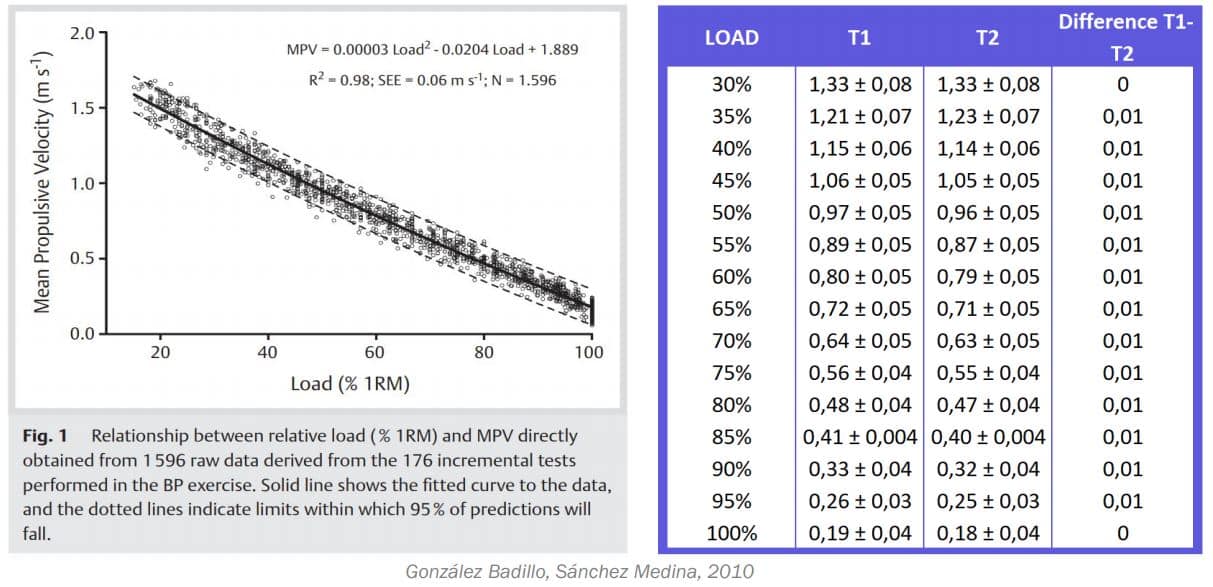
This means that if we can measure the velocity of any lift, we can determine the percentage of RM represented by the load we are moving. Therefore, we can ascertain our 1RM each day without having to actually lift the weight and reach failure to find out.
Moreover, during this same study, two tests were conducted, with several weeks between them and involving the same group of individuals. Based on this, it was concluded that the variation in speed at which a certain percentage of RM can be lifted is highly insignificant. This implies that if we conduct a test and a person can lift their 60% at a speed of 0.5 meters per second, if the test is repeated a month later, the speed will likely be very similar once again.
This information is incredibly valuable as it allows us to accurately calculate our 1RM in each training session using a single load-velocity profile. Apart from saving a significant amount of time, this approach helps us optimize load adjustments.
Conclusions from the 1RM study
Therefore, we can draw two conclusions from this study:
- If we can create a profile for each individual, we can estimate each athlete’s 1RM highly accurately every day.
- Once the profile is established, we can use it for subsequent weeks, as the speed at which each athlete lifts their RM percentage is not likely to vary significantly. Consequently, with a single lift, we can calculate each athlete’s 1RM in every training session.
How To Create a Load Velocity Profile?
What’s needed to create a load-velocity profile is to perform incremental lifts with various percentages of RM and calculate the velocity for each one. It’s advisable to start with around 30% or 40% and gradually work up to approximately 80% of the RM. This way, you’ll have a broad range of RM percentages to understand how an athlete responds to different submaximal percentages.
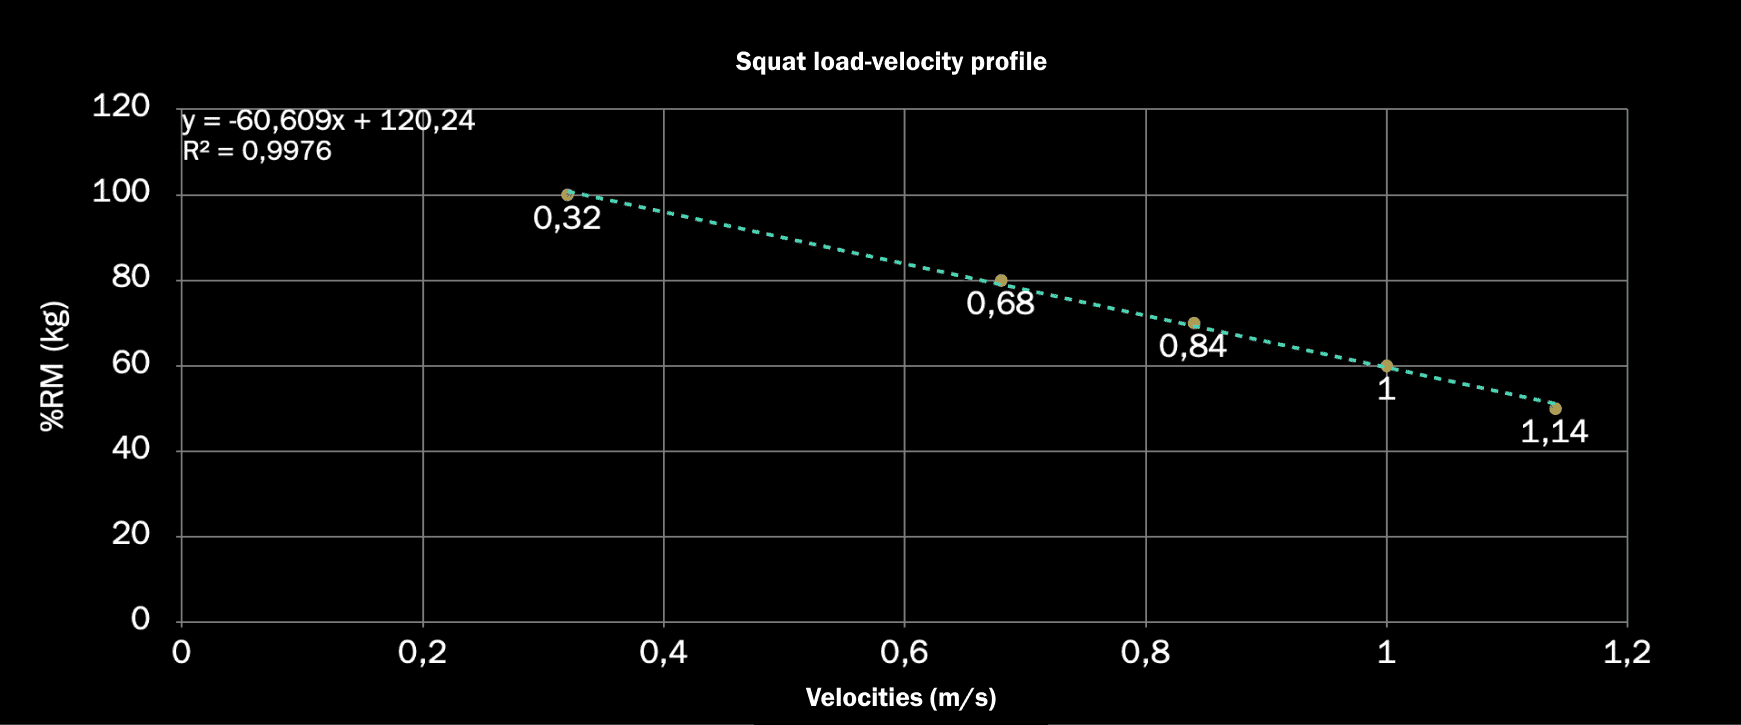
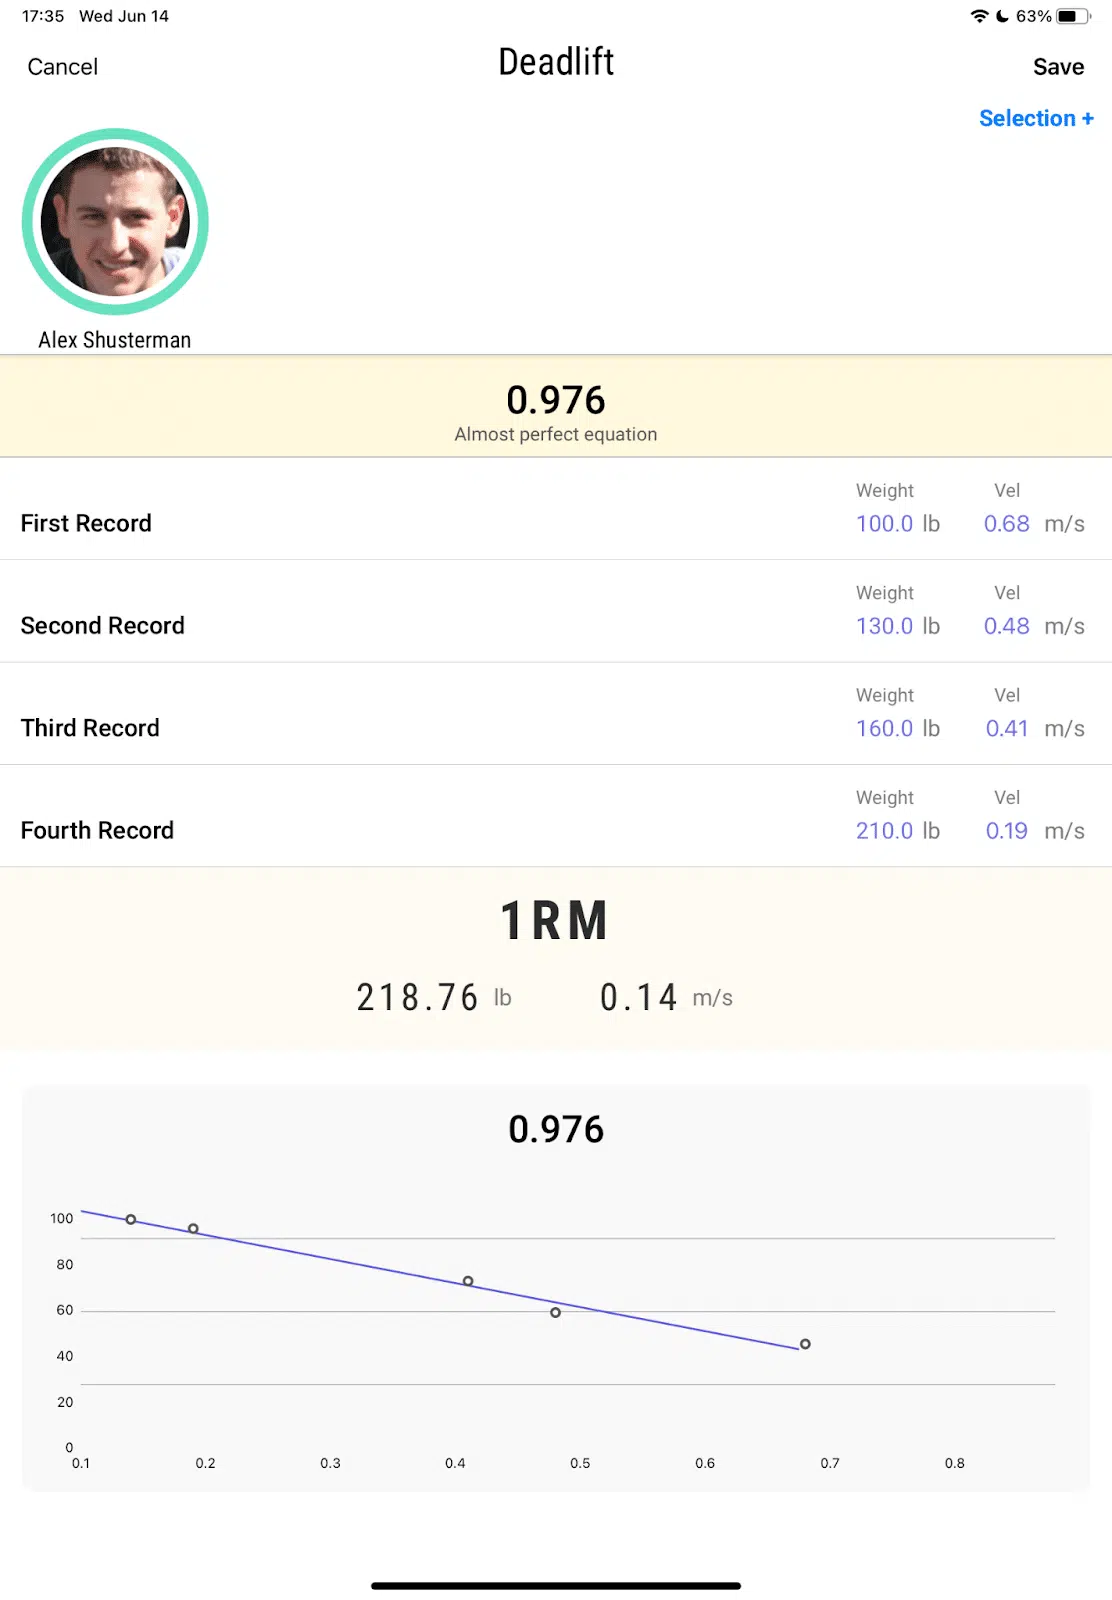
In the image, we can see a profile created with five loads: 110 lb (1.14 m/s), 132 lb (1 m/s), 154 lb (0.84 m/s), 176 lb (0.68 m/s), and 220 lb (0.32 m/s). When connecting all these points with a linear regression, we should obtain a nearly perfect line. If the test is conducted correctly, the correlation is 100%, so all the points will lie on that line. However, if the test hasn’t been executed accurately, some points might fall above or below the line. In this case, we can observe that the first point is slightly below the line, and the third and fourth points are slightly above it. Nevertheless, it’s still a highly precise profile.
Once the profile is established, it can be used for two essential purposes:
Estimating the 1RM for each session:
We can determine the athlete’s 1RM every day without having to lift it. For example, with a weight at 70%, thanks to this profile, we can estimate the 1RM with a high degree of accuracy.
Assessment method:
Having a specific athlete’s profile, we can repeat the test after some time to check if they have been able to lift the same loads faster. This would indicate if they’ve gained strength, as they can apply more speed to the same weight. Thus, we can determine whether they’re making progress and make decisions based on this information.
In the following image, we show two tests of an athlete with a four-week difference. The blue line corresponds to the first test, and the orange line corresponds to the second test.
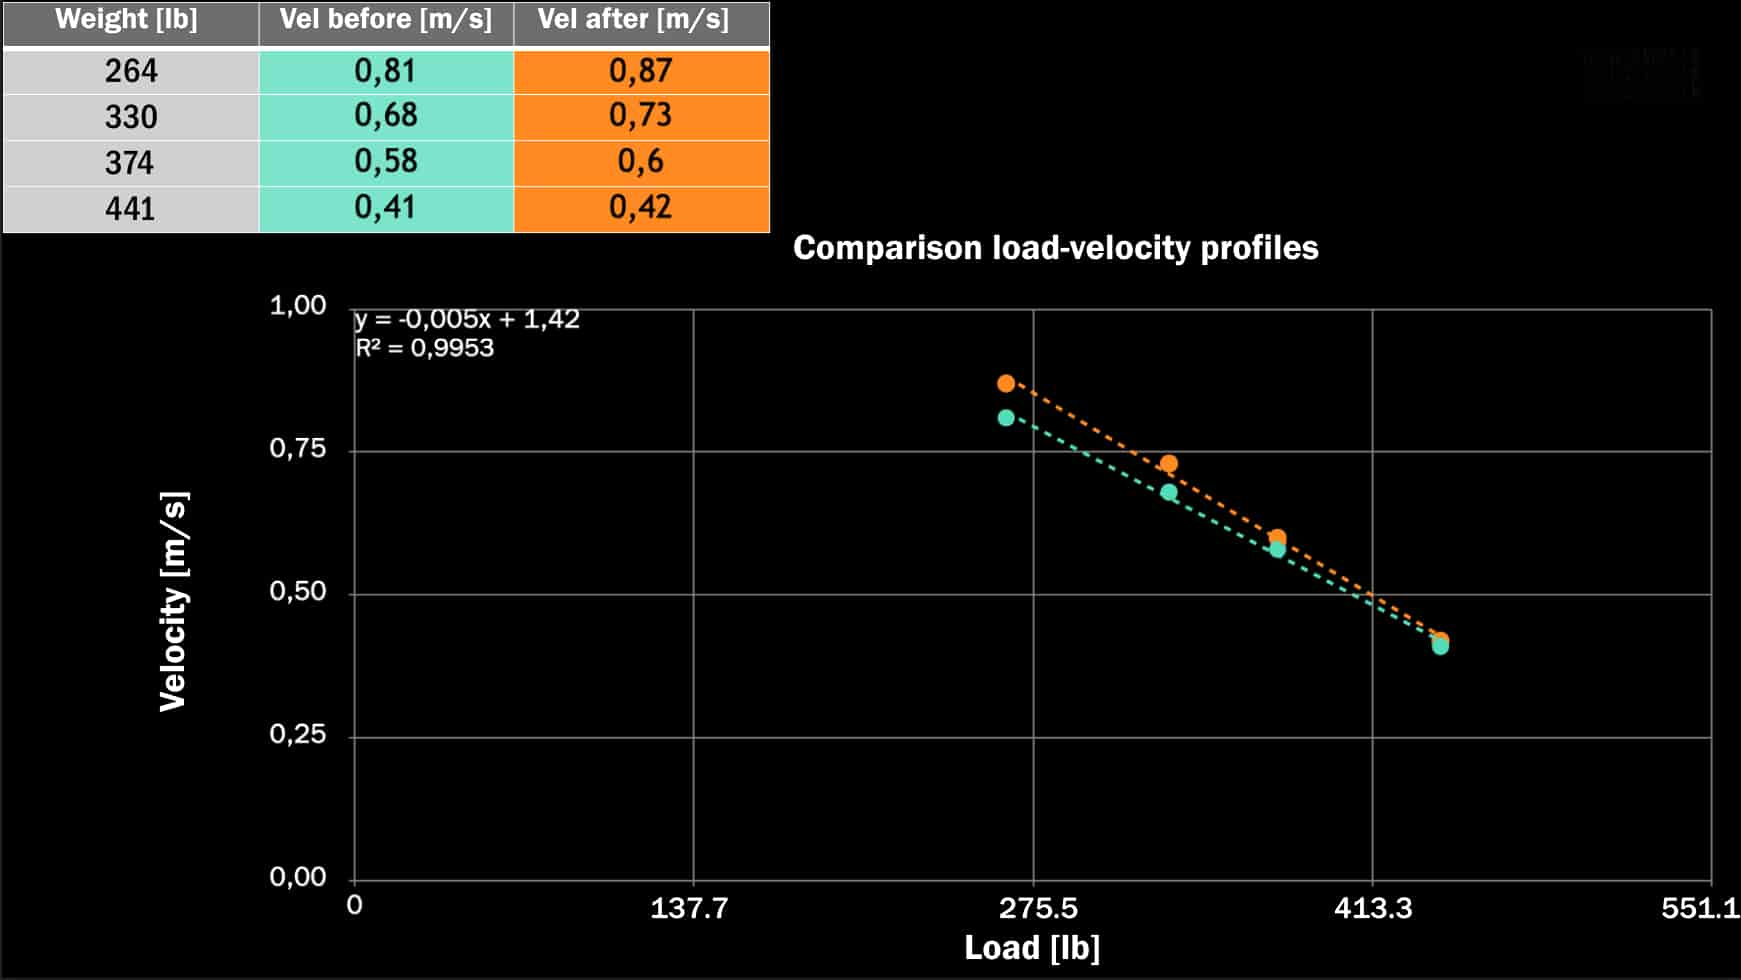
The first test was conducted with weights of 264 lb (0.81 m/s), 330 lb (0.68 m/s), 374 lb (0.58 m/s), and 440 lb (0.41 m/s). After training for strength over four weeks, the athlete repeated the test with the same weights to assess whether there had been any improvement. For 120 kg, the velocity was 0.87 m/s, indicating an improvement of 0.06 m/s compared to the previous test. The same trend was observed in the other results. The improvement was 0.05 m/s for 150 kg, 0.02 m/s for 170 kg, and 0.01 m/s for 200 kg.
When comparing the results and the lines, it’s evident that the lifting velocity has increased, particularly in the relatively low percentages, while in the maximum percentages, mainly from around 70%, the improvement has been less noticeable. From this, we can infer that this athlete likely focused their training on the lower percentages, which is why their improvement was much more pronounced. On the other hand, they probably haven’t trained much in the higher percentages, explaining the relatively smaller improvement in those ranges.
Hence, if our goal was to enhance the athlete’s performance with medium percentages, we can conclude that this goal has been achieved, as they are capable of moving the same weight much faster.
5 Keys to Creating a Load-Velocity Profile
Now that we’ve seen a real example of how to create a load-speed profile, let’s recap some of the things we’ve been discussing to make it very clear what recommendations we provide at Vitruve when it comes to creating a load-speed profile to ensure it turns out well
1. Use a broad range of percentages:
Ideally, select a range between 30% and 80%. If you choose too narrow a range, for example, from 30% to 50%, you won’t be able to gauge how an athlete performs at 60%, 70%, or 80% of their one-rep max (1RM), and thus, you won’t accurately estimate their 1RM. There’s also no need to approach 85% or 90% because it’s rare for an athlete to find lifting such heavy weights useful, but you can go up to 75% or 80%.
2. Space out the percentages:
It’s important that the percentages for the four lifts you perform are as far apart as possible. For example, 30%, 45%, 60%, and 80%. Avoid, for instance, doing 30%, 35%, 40%, and 80%. Otherwise, you’ll miss out on valuable information.
3. Allow sufficient rest between lifts:
As weight increases, athletes become fatigued, so it’s advisable to rest adequately before attempting the next lift, typically between 3 and 5 minutes. If you don’t, the lifting speed will decrease, and the test won’t be reliable.
4. Perform lifts under consistent conditions:
All lifts should be done under the same conditions. This means if the coach assists the athlete in lifting the bar in the first attempt, they should do so for all attempts. The same goes for motivational cues or shouts. Otherwise, conditions would be changing, and the speed could vary.
5. Lift each load as fast as possible:
The athlete should be familiar with the exercise to perform it as quickly as possible. If it’s not done as fast as possible, the profile won’t turn out well.
How to Detect When A Profile Hasn’t Been Created Correctly?
The app will notify us if the profile has been created correctly or incorrectly. At the top, you will see a number ranging from 0-1. This number is the R^2, and ideally, it should be above 0.98. The higher the number, the stronger the correlation between the measurements taken, meaning they are closer to forming a perfect line.
Ideally, it should be 1, but it’s never exactly that way, and typically, it’s higher than 0.98. If it’s lower, you should pay attention to which repetition deviated from the line and try to understand what happened. The most common reasons are mentioned in the previous section.
If you have an R^2 below 0.98, it’s ideal to repeat the test on another day.
How To Estimate a Loaded 1RM
Once we have the profile correctly set up, for each new lifting we perform, the app will estimate the 1RM based on it. Hence the importance of having a well-made profile.
We haven’t discussed it yet, but the app comes with predefined load-velocity profiles so that you can estimate your athletes’ 1RM in a wide variety of exercises without having to create an individualized profile. It’s not as precise as creating a profile for each athlete, but it’s quite accurate, and you’ll save a lot of time.
Imagine that we create our profile, go to the gym on another day, load 220 lb on the bar, and perform a lift. The app will indicate what our 1RM is for that speed and weight. With this information, we can adjust the training load to the desired percentage. For example, if we want to work at 80%, the app will tell us what the real 80% is at that moment.
However, for the 1RM estimation to be as accurate as possible, it is necessary to follow the following tips:
- Use a weight that falls within the ranges we used when creating the profile. Otherwise, the 1RM may not be accurate. Suppose we have created a profile ranging from 0.81 m/s to 0.14 m/s. The latter is the default speed in the app. Based on this test, it would not be advisable to estimate the 1RM at a speed higher than 0.81 m/s. For example, at 0.91 m/s or 1 m/s, the 1RM may not be precise since we haven’t considered this speed in the test. That’s why it’s crucial to conduct a comprehensive test, and the speed used for 1RM estimation should fall within this range.
- Always use the same load. This not only provides consistency but also makes it easier to track progress. For example, when warming up, we always estimate our 1RM in squats with 220 lb. This weight should be around 70% of the athlete’s capability; it doesn’t need to be exactly 70%.
What’s important is always using those 220 lb. First, it serves as a quick test—if the athlete lifts the same weight faster today, it means they are stronger today.
Second, by using the same weight consistently, we ensure the athlete is comfortable with it and always estimates the 1RM under the same conditions.
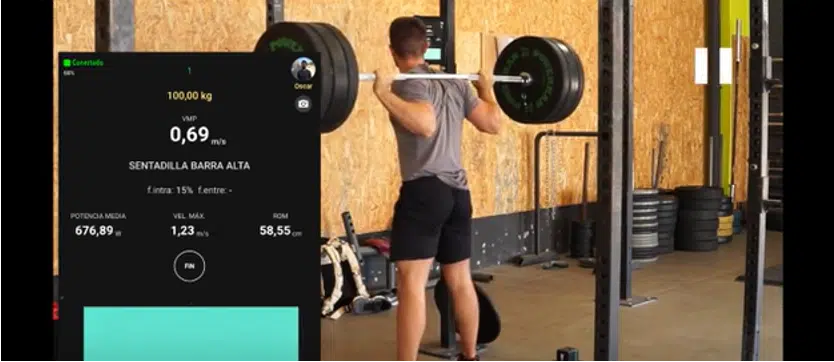
In this example, we see how to estimate the 1RM with a load of 220 lb, which is between 70% and 80%. The speed is 0.69 m/s.
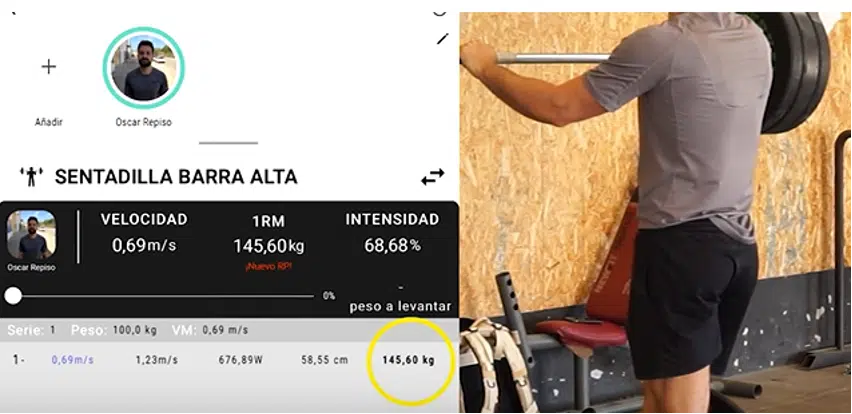
After the lift, the app will show the athlete their 1RM for that weight and speed. In the next image, we can see that it’s 321 lb. Therefore, if they wanted to work at 50% of their 1RM, they would simply multiply 321 lb by 0.5, which would be 16.4 lb.
The Vitruve app automatically performs this calculation.
Certainly, being able to estimate the 1RM in each session represents a significant advancement compared to the traditional way of doing it. Thanks to this, we can ensure that the intensity prescribed by the coach is actually implemented in the gym while reducing the fatigue and risk of injury for the athletes.
When an athlete is more fatigued, their 1RM will be lower, so they will load less weight on the barbell, performing what the coach has actually planned. Otherwise, if they attempt a weight that is too heavy, it’s likely they won’t be able to lift it, significantly increasing the risk of injury and negatively impacting their athletic performance, which is obviously counterproductive.
It’s important to consider that the purpose of going to the gym is for the athlete to improve in their specific discipline, not to worsen their performance because the coach hasn’t been able to adjust their training load. Hence, the importance of knowing the athlete’s real intensity during the lift. The only way to achieve this is through velocity-based training since other traditional tools are often not very precise.
Load-Velocity Profile Alternatives
When a coach has many athletes to train, they may not always have enough time to create a load-velocity profile. While load-velocity profiles are indeed valuable for estimating 1RM and tracking progress, there are alternative approaches that can be used to maximize results with athletes, especially when time is limited.
Through various studies, it has been observed that most individuals move different percentages of their 1RM in various exercises at a very similar speed, as can be seen in this graph.
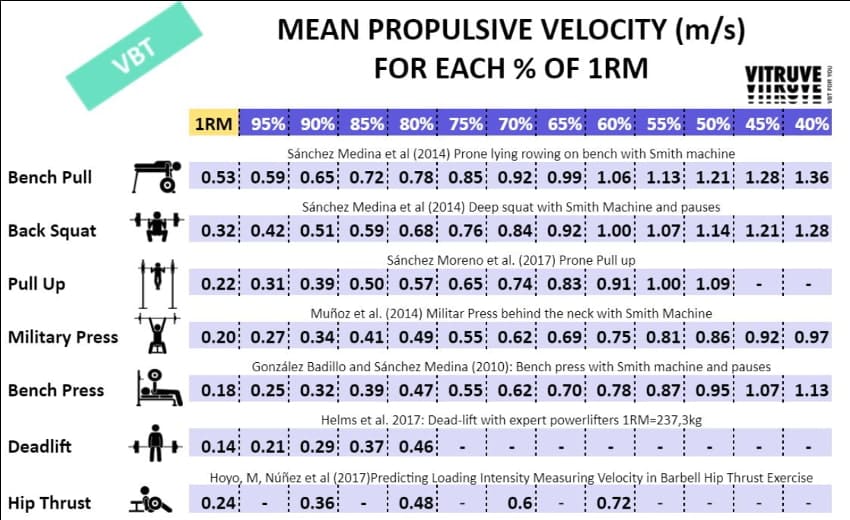
For example, in the first exercise, which is bench rowing, we can see that most people move their 1RM at 0.53 m/s, 95% at 0.59 m/s, 90% at 0.65 m/s, and 85% at 0.72 m/s. If we look at it closely, we have the percentage of 1RM and the corresponding velocity.
Thanks to this, we can have a load-velocity profile based on scientific studies, where an average has been calculated with a significant sample of people for the most significant and demanding exercises. It has been determined that these speeds are roughly what most people use. As a result, it’s an approximate estimation of 1RM, eliminating the need to create a specific load-velocity profile for each athlete.
In our application, these profiles are already predefined, and with just one lift, it’s possible to estimate 1RM without the need for an individualized load-velocity profile.
The only drawback is that, although it can adapt to most individuals, there will be others for whom it is not very accurate. It can serve as a good starting point, but testing may be necessary. In cases where the 1RM estimation is not accurate and you have the time, you can create a personalized profile, which will also help you assess whether the athlete is improving or not.
In addition to individualized load-velocity profiles and those based on scientific studies, there is another method we will discuss later. This method is much faster and doesn’t require any specific profiles or knowledge of the athletes’ 1RM. As we’ve seen, for many sports, it may not even be useful. Instead, it directly works with velocities, making it much quicker to implement, especially for teams with many athletes.
Conclusion about the 1RM in Velocity Based Training
To conclude, let’s summarize the key concepts we’ve discussed in this section so that you have a clear understanding:
- There is a perfect relationship between velocity and intensity. Knowing the velocity allows us to determine the percentage of 1RM, enabling us to adjust the load accordingly.
- We can create a load-velocity profile for each athlete to estimate their 1RM and track their progress over weeks.
- We can use profiles based on scientific studies, which, while not perfect, can be suitable for many athletes.
- We can estimate the 1RM daily with a single lift during warm-up using either the individually created profile or a predefined profile.
These concepts highlight the importance of velocity-based training and its various approaches to optimizing training for athletes.
Optimal Repetitions to Gain Strength
Did you know that not monitoring your athletes’ fatigue can significantly limit their performance? Not only that, but it also increases the risk of injury and hinders their progress in the weight room, which is crucial for improvement in their specific sport.
That’s why in this section, we want to teach you how to quantify fatigue to tailor and personalize the training for each athlete, so that each of them undergoes just the right amount of training that helps them improve.
Tracking Athletes fatigue – Why is it so Important?
It’s important to consider that each athlete is completely different, so each of them fatigues differently when performing the same number of repetitions.
This means that if two athletes perform a set of 7 repetitions at 80% of their 1RM with the same relative intensity, even though they are doing the same exercise, they will fatigue in a different way.
And the level of effort, meaning how challenging it will be for each of them, will also be different.
For this reason, training based on a fixed number of repetitions, as traditionally done, appears to be illogical. It is necessary to individualize fatigue for each athlete because, in this way, we ensure that they do not over-fatigue and increase the risk of injury.
Imagine, for example, a soccer player who goes to the gym to improve their performance but ends up getting injured because they didn’t correctly adjust fatigue, repetitions, and load. It’s even possible that their performance in soccer worsens as a result.
The only thing they would achieve is wasting their time. That’s why it’s essential to know how to manage fatigue within each training session.
Relationship Between Loss of Velocity & Fatigue
Velocity-based training allows us to calculate the fatigue of each athlete individually. The goal is to measure the actual fatigue of each athlete at every moment during the training, meaning in each set and each repetition. Thanks to this, we can make informed decisions, such as knowing when to stop a set.
To achieve this, it’s necessary to monitor the loss of speed within each set. To help you understand, let’s use a very simple example.
Imagine we are conducting a training session in which we instruct our athletes to perform 10 or 15 repetitions. As they perform these repetitions, they will become more fatigued, and their movements will become slower. The speed at which we can lift, for example, 50% of our one-rep max (1RM), will be much faster at the beginning than as we approach muscle failure. As it becomes more challenging, we move the weight more slowly.
Several studies have shown that some fatigue indicators, such as lactate, are correlated at 95% with this loss of speed. Therefore, if we can measure the speed of each repetition, we can calculate the percentage by which it has decreased and, consequently, control fatigue.
Knowing the loss of speed within a set, we can precisely control the fatigue accumulating in the athlete. In this way, we can decide how much “we want” them to tire in each of the training sessions.
If an athlete has a game or competition over the weekend, we must ensure they arrive in optimal condition. If we don’t control the gym variables, such as intensity and, in this case, fatigue, we run the risk of them not being in peak condition. It’s important to remember that the gym is a means to improve in their specific sport, so it makes no sense for the gym to make them worse.
Fatigue Control- Supported Research Studies
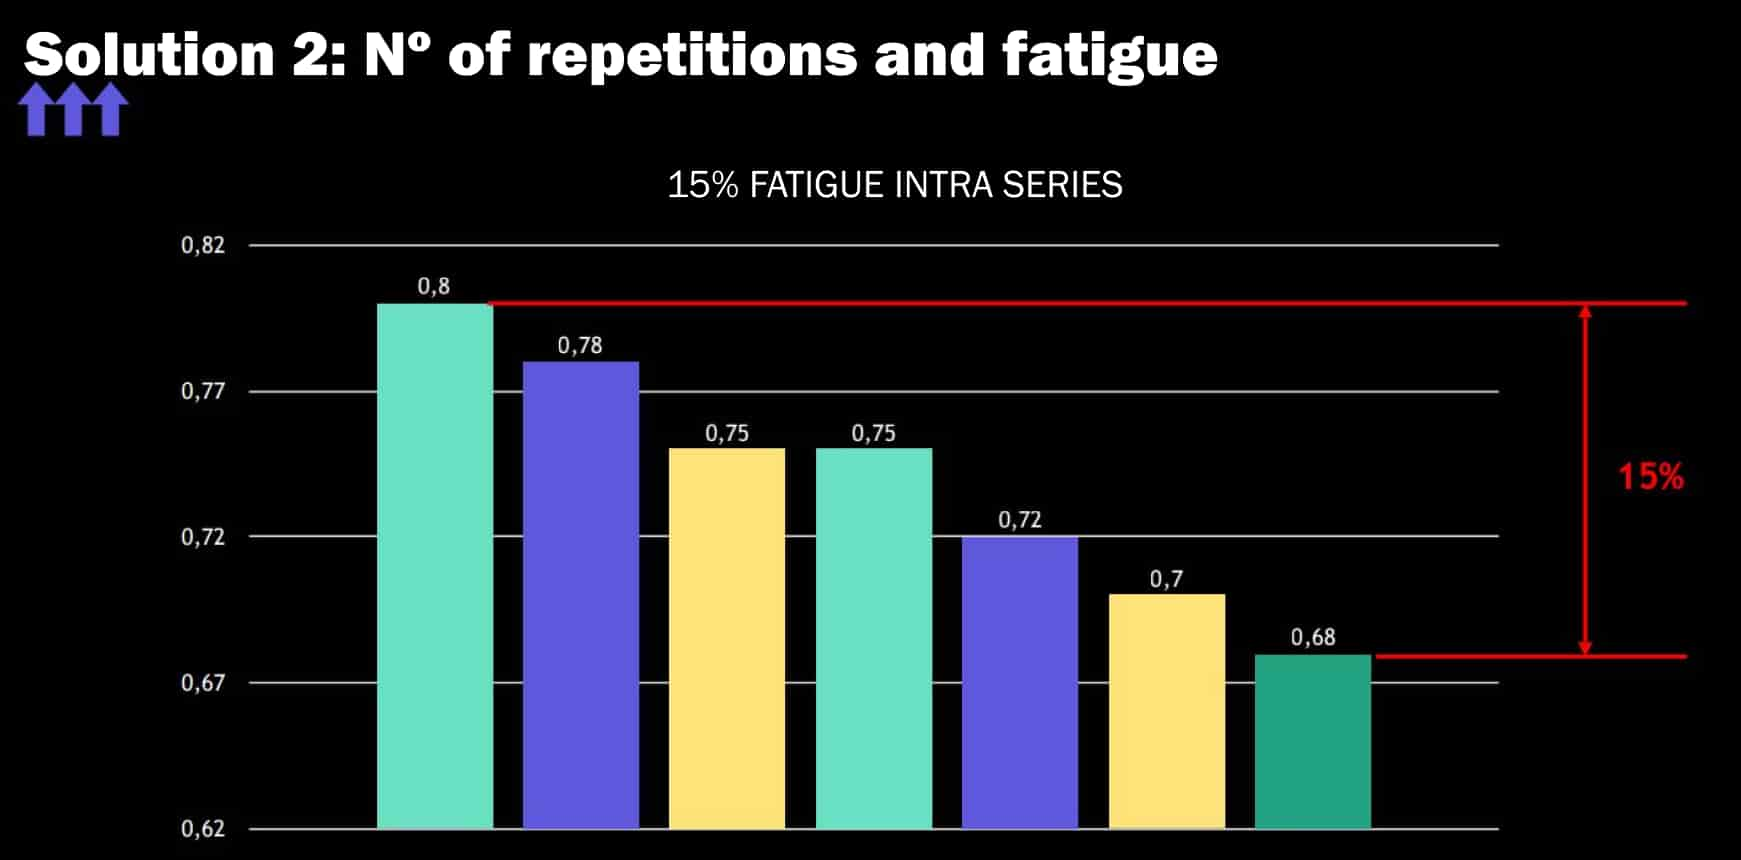
But, are there really studies that demonstrate the real importance of measuring fatigue in each set? Yes. In the study we displayed in the image, four groups of people were selected. They all trained with the same sets and relative intensity, but what varied was the accumulated fatigue. Each group performed a different number of repetitions. One group trained with low repetitions, two with moderate, and one with high repetitions.
The group that performed the most repetitions reached around 300 repetitions per training session. Another group did about 150 to 170 repetitions per training session. What’s really interesting is that, even though the first group put in more effort, got more tired, and spent more hours in the gym, the second group achieved better results with half the training.
The issue is that, currently, it’s more common than you might imagine to find coaches who are prescribing fatigue incorrectly to their athletes, making them invest more hours of effort and tire themselves out more.
This not only significantly reduces their performance but also substantially increases the risk of injury. This is exactly the opposite of what athletes are looking for when they come to the gym.
How to Find the Optimal Fatigue for Each Athlete?
So, which is the correct level of fatigue to use with each athlete? The answer is quite complex because it depends on multiple factors, such as the individual’s characteristics, the type of sport, the training sessions, the frequency, the loads, and more.
What’s really important is that, by being able to control each individual’s fatigue, we can start by programming a certain level of fatigue and then experiment. If we observe that the athlete responds well, recovers, and improves their performance, we can maintain that level of fatigue. But if we notice that the athlete is feeling too fresh and it’s too little for them, we can increase it. Even if we see that they’re not recovering from one session to the next, we can reduce it. This way, we can understand what’s happening and make the right decisions in the gym.
Nevertheless, there is indeed some evidence regarding the optimal fatigue level to achieve the greatest strength gains. Most studies suggest that training with fatigue levels below 20-25% can yield the same results or even better than training with higher levels of fatigue.
Therefore, a good starting point could be to train with around 10-20% or at most 25% fatigue but not exceed that limit. This way, we ensure that, according to scientific evidence, we are operating within a fatigue range that the athlete can tolerate well and that will provide them with the greatest strength gains.
Why is Loss of Velocity The Only Efficient Way to Measure Fatigue?
Furthermore, it’s important to mention that many fitness trainers use RPE (Rating of Perceived Exertion) or RIR (Repetitions in Reserve), which are based on a perceived effort scale.
For example, an RPE of 10 means that the effort being exerted is maximum. This could be, for instance, in a set when one reaches failure, when they can’t do any more repetitions. With an RPE of 9, the athlete would be approaching near-maximal effort, so they might be able to do one more repetition.
Using this scale, which ranges from 1 to 10, the goal is to measure the fatigue that each athlete accumulates without needing to know the speed. However, there is a significant drawback.
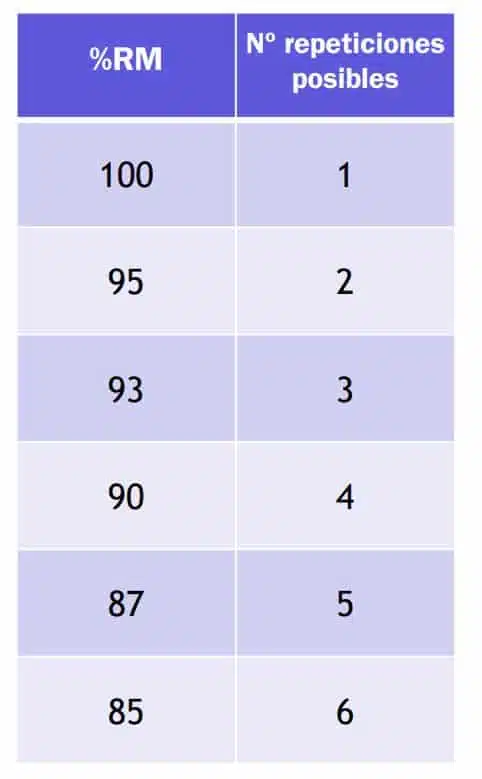
As we can see in the following table, with very high intensities or loads, it can be relatively easy to determine the RPE or RIR. For example, it’s quite simple to assess if one could do one more repetition. But how can we know if there are 4, 5, or 6 more repetitions until failure? That’s very challenging.
The issue is that the optimal fatigue level for performance improvement should be between low and moderate levels. As we can see, the number of repetitions is quite low compared to what we could do, meaning we would be far from failure. And when we are far from failure, using RPE becomes really complicated.

Therefore, this method is not effective. Firstly, because the fitness trainer cannot ensure that the athletes know how to use it correctly, and secondly, because being so far from failure, we cannot obtain truly precise data.
That’s why, based on scientific evidence, the methodology we recommend at Vitruve, because we consider it to be the only correct one, is to measure the loss of speed within each set, repetition by repetition, to determine the exact point at which we should terminate those sets.
Feedback’s Importance
In this section, we are going to demonstrate how making a small change in your workouts can achieve three things: keeping your athletes much more motivated, improving their adherence, and creating the best possible atmosphere in the weight room to significantly enhance their performance. Additionally, we will explain, through real examples, how to apply this with each athlete in every strength training session.
Essentially, what we aim to do is provide a solution to one of the major issues faced by most traditional fitness trainers. That’s why we will demonstrate how important intention is when performing repetitions of an exercise and applying maximum force and power with every weight, in every set, and in every repetition of your workouts with your athletes.
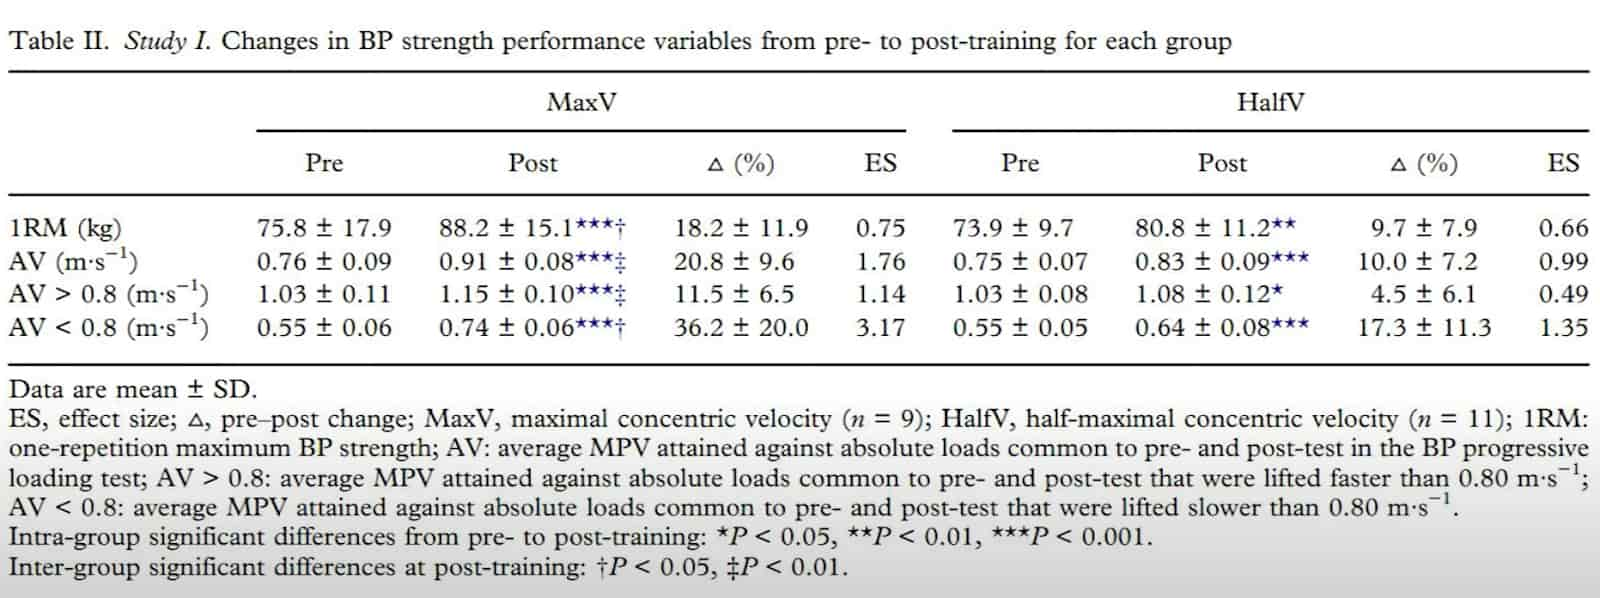
As mentioned earlier, we’ve already highlighted the importance of lifting the weight as quickly as possible based on real studies. In the example study we mentioned, two groups of athletes were selected, and for several weeks, they were both put through a strength training program.
The key difference was that one group applied maximum power to each repetition, in other words, with the utmost intensity and speed possible. On the other hand, the other group performed repetitions at half of their maximum possible intensity.
After four weeks of strength training, it was observed that, although both groups improved, the group that lifted as quickly as possible improved up to double the weight added to their 1RM (one-repetition maximum). This means that with the same training program, the same sets and repetitions, and the same weight, we can achieve double the improvement in our athletes’ performance by ensuring they lift the weight as quickly as possible.
This is crucial because it implies that by dedicating the same amount of training time, with the same sets and repetitions, and the same weight, we can make athletes improve twice as much.
Therefore, it would be absurd not to take advantage of this. In fact, due to its excellent cost-benefit ratio, we consider it one of the most important aspects of Velocity-Based Training. It doesn’t require changing the training or programming. Simply by ensuring that the weight is lifted as quickly as possible, a much greater improvement can be achieved. This also increases motivation, enhances the atmosphere in the weight room, and improves adherence to training.
But what does “lifting quickly” mean? Although some believe it’s about putting very little weight on the bar and lifting at very high speeds, what it really means is that, with any load, at different percentages of the 1RM, you lift at the maximum speed that weight allows.
Obviously, as we add more weight to the bar, the speed will be lower because the effort required is greater. However, the athlete’s intention should always be to lift that weight as quickly as possible, regardless of the weight on the bar.
It’s essential to consider that, for athletes who are just starting out, it’s not advisable to ask them to lift quickly until they have learned to perform the exercise technique perfectly. If the athlete doesn’t know how to perform a squat correctly, they won’t be able to do it quickly and may risk injury.
So, the first step is to ensure the athlete’s technique is correct. Only then should we begin teaching them to lift quickly. Athletes who are not accustomed to it may struggle to lift quickly, so it takes a little learning process.
The point is that certain difficulties must be taken into account when applying this approach to each athlete and ensuring that each athlete is giving their maximum effort in each repetition. Fortunately, we have several ways to monitor this, which we will look at in the following scientific study.

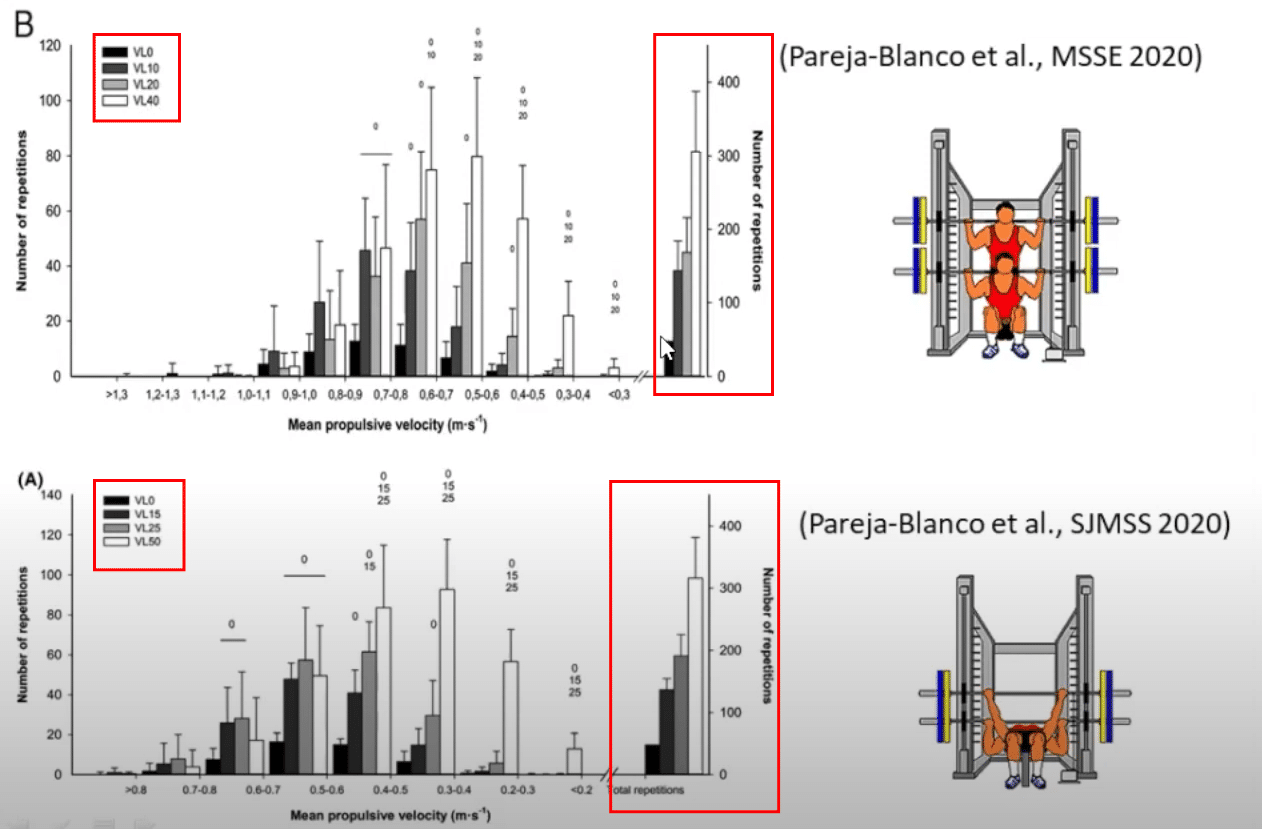
What was done was to take several groups of athletes. The control group, represented by the line that goes below the others, was asked to perform repetitions without any additional feedback. However, the other three groups were given information about the speed at which they were lifting, so they unconsciously tried to lift faster to surpass that speed. In addition, they were shown the speed visually for each repetition and were encouraged to lift faster.

Best Velocity Based Training Devices – Full Review 2025
As we can see in the graph, those three groups managed to lift much faster in each repetition. In contrast, the control group, which received no feedback, did not lift as quickly as they could, so their strength might not be improving in the same way as the others.
It’s important to note that the control group represents the general approach in the world of weightlifting strength training and among many fitness trainers who do not implement Speed-Based Training. They prescribe a program of repetitions, sets, and weight to their athletes but do not ensure that they are lifting at maximum speed.
According to this study, if we do not provide constant feedback in each repetition, athletes will not lift as much weight as they can.
Among these methods, we have developed a ranking table. Essentially, it takes the speed within a training session with multiple athletes. Imagine a soccer team training together in the gym. All athletes are monitored, so we can track the speed of each repetition at all times. With this information, we create a ranking of athletes based on how quickly they lift and the relative power they can generate to match them.
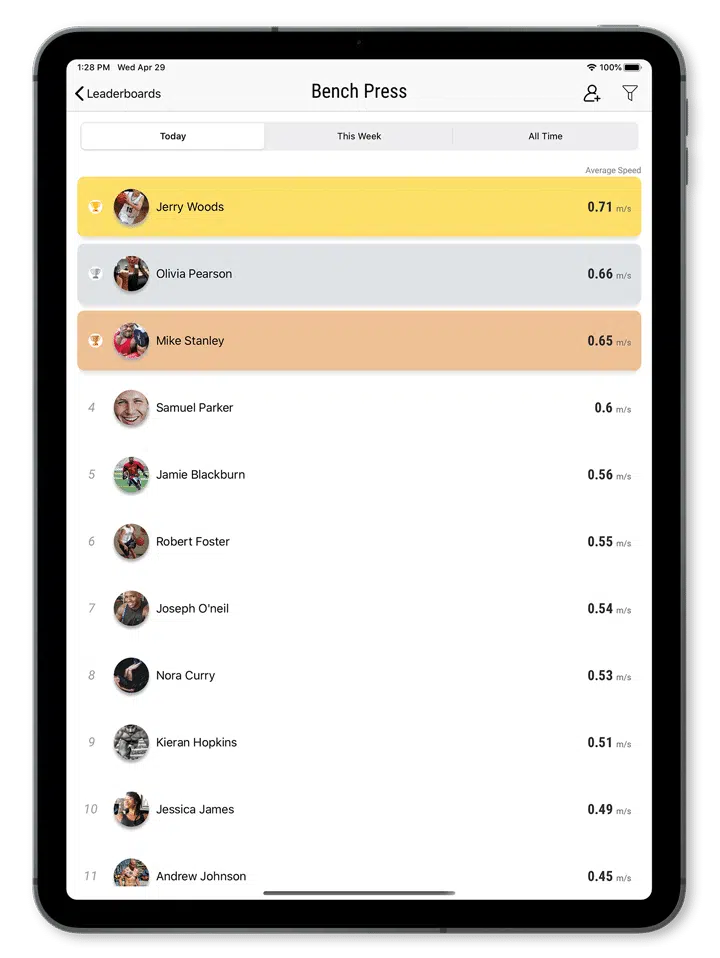
Based on this, each athlete will have a ranking position, which creates competition among them to achieve better rankings and fosters a fantastic training atmosphere while significantly increasing motivation. In the end, everyone ends up lifting as quickly as possible to outperform each other or even to surpass their previous records.
Velocity Zones
The content of this section is based on the experience of the thousands of customers we have worldwide and how they have successfully adapted velocity-based training. This adaptation is not only to benefit from what scientific studies indicate, as we have seen so far, but also to be able to apply it in a real-world context. While the conclusions of scientific research are valuable, when it comes to putting them into practice, we realize that we often lack the time and resources needed to implement them in actual athlete training..
Can Velocity Based Training Be Applied With Multiple Athletes At The Same Time?
The reality for most fitness trainers is precisely this: they often don’t have much time to spend with their athletes in the gym. Furthermore, it’s common for them to have not just one athlete but 20, 30, or even 40 athletes at the same time. Therefore, they need to be capable of integrating velocity-based training with all of them simultaneously.
That’s why many wonder if it’s possible to integrate Velocity Based Training. The answer is yes, it is possible. At Vitruve, we have clients like some universities or institutes in the United States where trainers have 60, 70, or even 80 athletes at the same time, and they are all applying velocity-based training simultaneously.
It’s a matter of organization and knowing how to apply VBT so that you can achieve the highest performance in the shortest amount of time. If you can accomplish this, it becomes very easy to implement. Moreover, it will help athletes improve their performance and significantly increase their motivation levels.
How To Implement VBT in teams with lots of athletes?
In this section of the guide, we are going to bring together the three points we have been explaining: intensity, fatigue, and feedback, in order to provide athletes with instructions that are easier to apply and quicker to implement.
For example, when we talk about intensity, we have discussed creating a load-velocity profile and estimating the 1RM through a single lift during warm-up. The drawback is that this takes time. First, we need to create a load-velocity profile, which, in addition to taking time, requires a consistent warm-up with the same load to estimate the 1RM accurately. The problem is that if the load-velocity profile we create isn’t accurate, the 1RM estimation won’t be precise either. We will address these problems shortly.
On the other hand, we have the fatigue percentage, which can be prescribed differently. Instead of discussing a percentage loss of velocity, we will talk about moving within a specific range of velocities.
Feedback is something we will always provide. Whenever there’s a screen in front of the athlete where they can see their speed and compare it to what they did the previous day to try to improve their performance, motivation will increase, so we will keep that aspect the same.
Specifically, this section will be primarily oriented towards teams since they pose more challenges for coaches when applying VBT due to the large number of athletes they comprise.
In team sports like soccer, paddle tennis, tennis, or baseball, strength levels are not typically very high, especially when compared, for example, to powerlifting, where training intensity is generally much higher. In powerlifting, methods like RPE (Rate of Perceived Exertion) or RIR (Repetitions in Reserve), which are subjective ways to quantify fatigue, can be effective. However, in sports like soccer, basketball, and similar ones, where we don’t really aim to approach the 1RM (One-Repetition Maximum) and focus more on average velocities, RPE and RIR become entirely impossible to apply.
If we are working with very little fatigue and a relatively low percentage of 1RM, it’s very challenging for the athlete to know how many repetitions are left until failure or what the effort level has been for that set. In fact, if we look at the following table, we’ll be operating mostly in the low and medium range, generally between the first two, where the loss of velocity is between 5% and a maximum of 30% (usually around 25%).
The number of repetitions an athlete will perform is typically half of the maximum number of repetitions they could achieve. For example, if an athlete can do a maximum of 12 repetitions, they will be doing a maximum of 6 repetitions in each set.
This is something that can be controlled by measuring the loss of velocity. In other cases, they may even work with many more repetitions in reserve before reaching failure.
This means that if they could do 16 or 30 repetitions, they are actually working with 4 or 6. Therefore, using RIR (Repetitions in Reserve), which essentially indicates how many repetitions we didn’t complete out of the total possible, is practically impossible to apply. In such cases, Velocity Based Training makes much more sense.
So, what’s the alternative to not having to create a load-velocity profile, not having to estimate the 1RM, and not even needing to focus on the athlete’s 1RM? For many athletes, we don’t need their 1RM, so it doesn’t make much sense to use it as a reference. In these cases, it is more practical to work with velocity zones.
How Does training with Velocity Zones work?
In the following table, which we have already seen before, it illustrates the relationship between velocity and the percentage of 1RM for different exercises. What was concluded is that most individuals move their 1RM at a similar speed.
For example, in back squats, the 1RM is typically moved at 0.32 m/s, the 90% load at 0.51 m/s, and the 70% load at 0.84 m/s. In this way, generic velocities were derived for various exercises, especially for those that are most commonly used in the gym.

Based on these velocities, we can change the way we prescribe workouts. For example, if an athlete is doing squats, instead of telling them to work with 80% of their 1RM and a 15% fatigue, we would instruct them to work with a weight they can move at around 0.68 m/s.
This way, we don’t need to know what their 80% of 1RM is or have a load-velocity profile. The athlete would start warming up, gradually adding weight to the bar, and once they reach a weight they can move at 0.68, 0.69, or 0.7 m/s, that weight becomes their 80% for squats, and they start training with it.
On the other hand, instead of telling the athlete to work with 15% fatigue, we’ll see in the following video what the alternative would be.
If we open the Vitruve application, in the “velocity zone” settings, we find four predefined zones where we can essentially work in different areas of the load-velocity profile. This way, we can select them instead of having to manually adjust them. Although, typically, we will still need to make some manual adjustments to decide in which velocity zone we want to work.
In the bottom bar, if we move the arrows, we can change the velocity zones we are working in, customizing them for both the lowest and highest velocities.
The difference between these two velocities represents the fatigue or loss of velocity that the athlete will accumulate during the set. If we move the velocity zone all the way to the right, we will deactivate the lower velocity zone and only have the high-velocity zone, which means that the application will only alert us if we exceed that velocity, but it will never do so for velocities below the one we have deactivated.
Benefits of Working With Velocity Zones
This way of working with velocity zones is much quicker and simpler than working with load-velocity profiles or estimating the 1RM with a load.
In the end, the instruction given to the athlete is simply to perform a number of sets between two specific velocities, with the athlete finding the appropriate weight and deciding when to end each set based on the information provided by the application.
This greatly facilitates the process when working with many athletes simultaneously and time is limited.
But what happens if the athlete selects a weight that is too light and could lift it faster than the upper limit of 0.7 m/s? The application would also provide a warning, and the bar would appear in a different color, indicating that more weight should be added.
As we can see, this is a fairly quick way to implement training because there is no need to spend time estimating the 1RM. By having these two velocities, we can control speed and fatigue. With the VBT encoder, the goal is to complete as many repetitions as possible, so athletes should always strive to lift as fast as possible to ensure their speed never drops below the red line.
Another common question is which velocity zones to use. This can be quite relative. If you search online for velocity zones, you’ll likely come across a table similar to this one, where velocities are shown below and the associated percentage of 1RM is shown above those velocities.
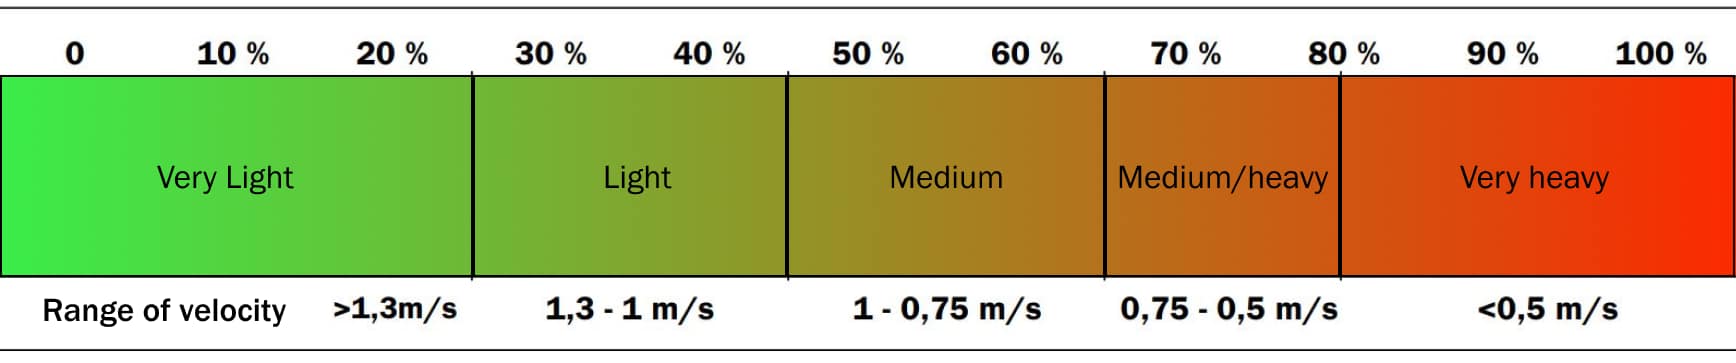
The problem with such a generic table is that it provides a one-size-fits-all approach, whereas each exercise has a completely different velocity profile. For example, in the squat, 80% might move at 0.68 m/s, while in the bench press, it might move at 0.47 m/s.
Therefore, such a generic table may not be as useful. It does allow us to get a rough idea of the approximate velocity at which an athlete should move if we want them to work at certain percentages of their 1RM.
If we want the athlete to operate at around 40% or 50%, we know the velocity should be between 1 and 0.75 m/s. However, having a more detailed table like the one you mentioned, which provides specific velocities for each exercise, is always better for accuracy and precision.
Which is The Best Tool For VBT?
In the previous sections, we’ve covered how to apply velocity-based strength training to address the issues posed by traditional planning methods. Among other things, we’ve discussed:
- The correct way to determine the weight to use in each training session to optimize performance.
- How to adjust fatigue to control how tired athletes become, helping them improve their performance while avoiding unnecessary injury risk.
- Providing feedback to motivate athletes to lift the weight as fast as possible, as scientific studies have shown that this significantly contributes to strength gains.
At this point, you have a comprehensive understanding of Velocity Based Training and can start implementing it. While we haven’t covered some beginner’s guidelines in detail, we will explain those in the future, as well as how to choose the best tools for this type of training.
Additionally, we’ll provide you with a tool we’ve created, which is currently the only completely free option for implementing velocity-based training.
How to choose the best Velocity Based Training Tool?
To apply Velocity Based Training (VBT) effectively, there are three conditions that must always be met when selecting a device:
- Accuracy and Data Consistency
It’s important that the device is valid for Velocity Based Training. The device must measure velocity with precision, typically at 0.01 m/s. Precise velocity data is crucial for VBT. The data provided by the device should be consistent. This means that if you perform two repetitions exactly the same way, the tool should give you the same velocity for both. If the device cannot provide this level of precision and data consistency, it should be discarded.
- Comprehensive and Intuitive Application
The application used with the tool is also essential. Generally, devices are used with platforms like iPad, iPhone, or Android phones. The application must be user-friendly, intuitive, and, most importantly, quick to set up. It should not disrupt the training process, and coaches should not have to spend more time than necessary on it. Many teams are implementing VBT and need a tool that athletes can handle themselves.
Therefore, it should be a straightforward tool that allows multiple athletes to be integrated simultaneously for group training, data to be uploaded to the cloud, and information to be shared among multiple devices.
- Encoder’s Price
The cost of the device depends on individual preferences and the budget of the club or team. If the budget is tight, you may seek a tool that meets the first two criteria (accuracy and ease of use) while being more affordable.
Teams usually purchase multiple devices based on the number of athletes they have. Typically, one device is used for every four athletes in real-time training. If a single device is used for too many athletes in one session, there may not be enough time for everyone to use it effectively.
Consideration of these three factors will help you choose the right device for implementing Velocity Based Training in your specific context.
Best Velocity Based Training Devices – Full Review 2025
Vitruve Encoder Strong Points
Before we continue, we would like to make something clear. We are Vitruve, and we have our own device, so you may think that everything we are going to explain is in our favor. However, we don’t want it to be that way, and that’s why we will try to be as objective as possible.
To achieve this, we will support our arguments with scientific studies, as they are the ones that truly demonstrate whether a tool is accurate or not.
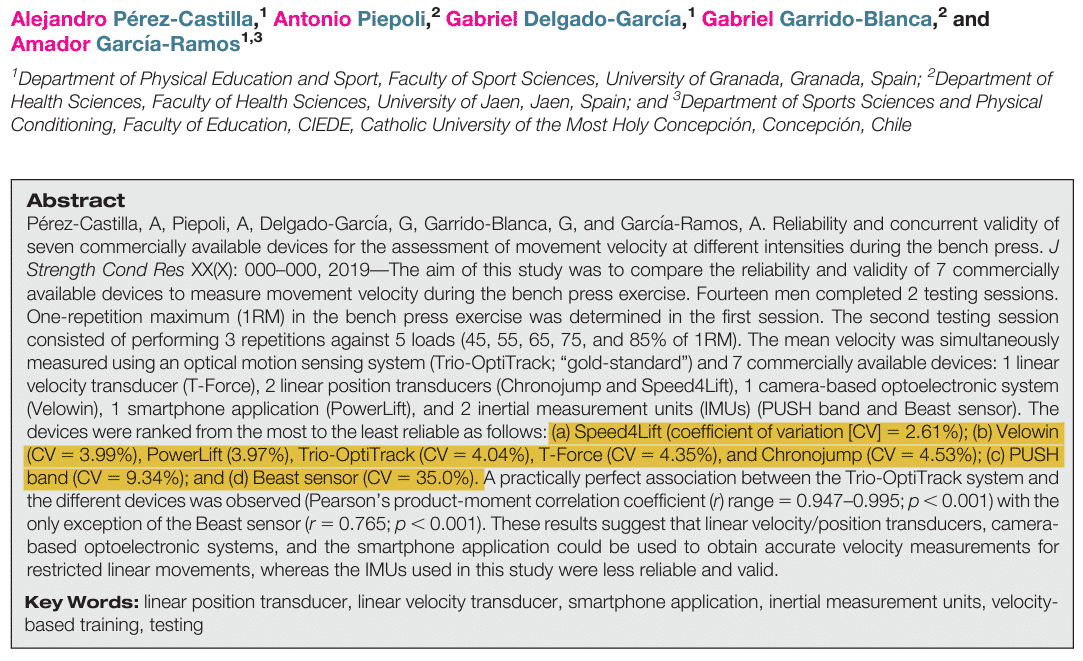
In this case, we will focus on research published in the Journal of Strength and Conditioning Research (JSCR), a prestigious journal, by a team of highly recognized experts. In fact, we could say that this is the most important research team in Spain when it comes to velocity-based training, and among them, Amador García Ramos stands out, who also has a publication with Bryan Mann.
This team has no conflicts of interest with companies, so we can be sure that the results have not been manipulated to favor anyone. Furthermore, since it has been published in a high-impact journal, we can be confident that it is a study with reliable and well-validated information.
Data’s Accuracy & Consistency
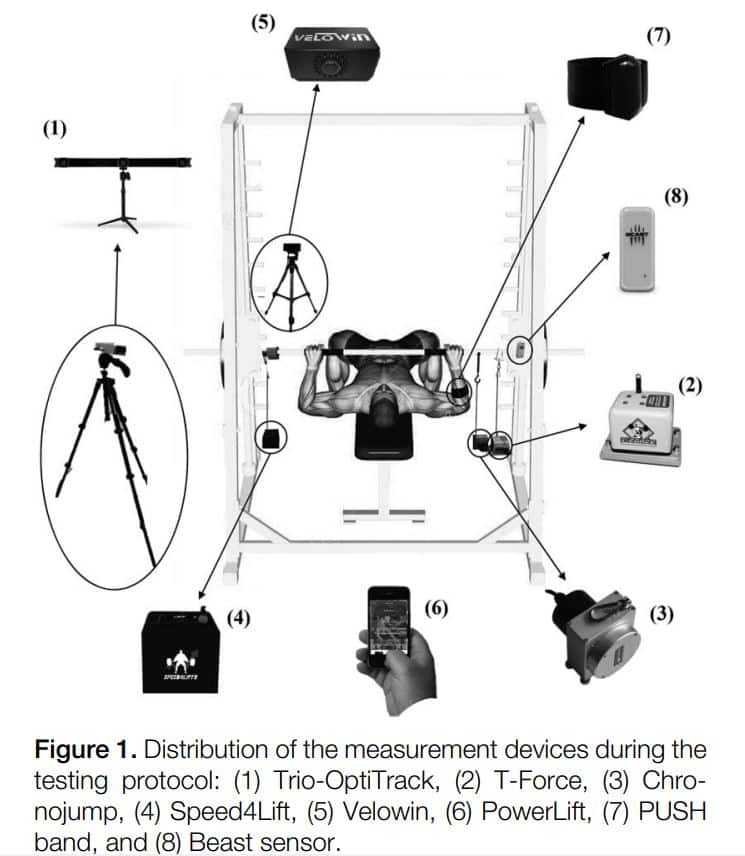
What we observe, initially, is that there are devices that are more accurate than others. In fact, the study mentions that IMU-based devices, such as Beast sensor or Push, were neither consistent nor accurate, and their use is discouraged. As we can see in the first image in the abstract, the devices used in the study are displayed in order from most to least accurate.
The devices used during the research were the following:
Orden de más a menos preciso y menos válido:
- Speed4lifts (4) – Vitruve (2.61%): The most accurate and valid of all for implementing velocity-based training.
- Velowin (5) (3.99%): infrared camera that detects the position of the bar and how it moves.
- Powerlift (6) (3.97%): mobile application.
- Trio-OptiTrack (4.04%): Although it is a high-precision camera, it is not specifically designed for velocity-based training but has different uses. Fundamentally, it analyzes the bar’s velocity, but this data needs to be processed later on the computer. Additionally, it’s important to consider that its price is high.
- T-Force (4.35%): linear encoder that consists of a small box containing a cord that can be attached to the body or the bar, depending on what you want to measure. This technology is known as the “gold standard,” generally providing very accurate measurements, more precise than accelerometers, cameras, or mobile applications. The same technology used in Vitruve.
- Chronojump (4.53%): It is also a linear encoder.
- Push Band (9.34%): It is an accelerometer.
- Beast Sensor (35%): Accelerometer.
Regarding accelerometers, the study points out that they are the least recommended tool for velocity-based training due to their precision and the low consistency of the data they provide. Although there is obviously freedom of choice, we prefer to rely on scientific studies to ensure that we are using a device that provides data we can trust.
At Vitruve, when we designed our encoder, our primary priority was accuracy because we wanted our users to have full confidence in the data it provides. It’s important to consider that this tool is used to assess our athletes, so it’s essential that it measures accurately and doesn’t provide random and inconsistent data.
Caution is necessary in this regard because some companies claim that their devices are accurate when they may not be. Therefore, before purchasing any such tool, it’s important to verify that it is supported by reputable and independent scientific studies.
An App That is Both Comprehensive & Intuitive
As mentioned earlier, it’s also crucial to assess the use of the application: How easy and how quickly it can be set up to avoid wasting time during workouts, allowing the fitness trainer to focus on the exercise. The problem is that we can’t always tell at a glance whether the application will meet these criteria, and often, we only realize it later on.
The same goes for the features offered by the application. For example, it might lack cloud storage, which would enable access from any device.
However, it’s also essential that it allows us to manage multiple athletes in real-time, as well as everything we’ve discussed regarding fatigue, feedback, load-velocity profiles, estimated 1RM, speed zones, etc. It is true that this may be a bit more challenging to ascertain initially, but the tutorials provided by these brands can help us determine if it aligns with what we are looking for.
The Price
For example, Vitruve’s encoder is up to 10 times more affordable than other linear encoders available in the market and, as we’ve seen in the previous study, it is more accurate. Moreover, depending on the user’s preferences, it’s quite likely that the applications are more user-friendly.
Because we genuinely believe that Vitruve is a great asset for trainers, we always offer a 30-day trial period. If within those 30 days, you find that Vitruve isn’t the right fit for you, you can return it without any explanations and receive a full refund.
You can see in detail how the app works here:
Velocity Based Training in 3 simple steps
So far, we’ve covered the concept of Velocity Based Training (VBT) from a scientific perspective, demonstrated how it addresses the shortcomings of traditional planning, discussed the extent to which it can enhance performance, highlighted the key aspects to monitor, and explored the tools currently available in the market. The only thing left is to explain how to start implementing Velocity Based Training from scratch.
You might have never used VBT with your athletes, created a velocity load profile, or quantified fatigue. Consequently, you likely have many questions. Can everything be implemented at once, or is it better to take it step by step? That’s precisely what we will explain in this section, providing you with guidelines so that, based on your level of experience, you can begin applying velocity-based training as early as today, whether using a linear encoder or our free application.
How To Implement VBT From Scratch?
First and foremost, it’s essential to emphasize that athletes must be capable of performing the exercise with proper technique, which they should have internalized to apply maximum speed to the bar. Therefore, if they don’t know how to execute the exercise correctly, before beginning to implement VBT, it’s necessary to invest time in teaching them how to perfect it.
Once they have mastered the technique, they need to be taught how to apply maximum possible velocity for each lift. To ensure this, we must measure velocity. If it’s done correctly, as the athlete progresses through the set, the velocity will decrease with each repetition. If not, it means that the maximum speed is not being applied in each repetition, so this should be the first aspect to address.
Once the technique is performed correctly, and the athlete applies maximum speed in each lift, we can begin implementing the steps of VBT, which we will explain below.
Providing Feedback To The Athletes
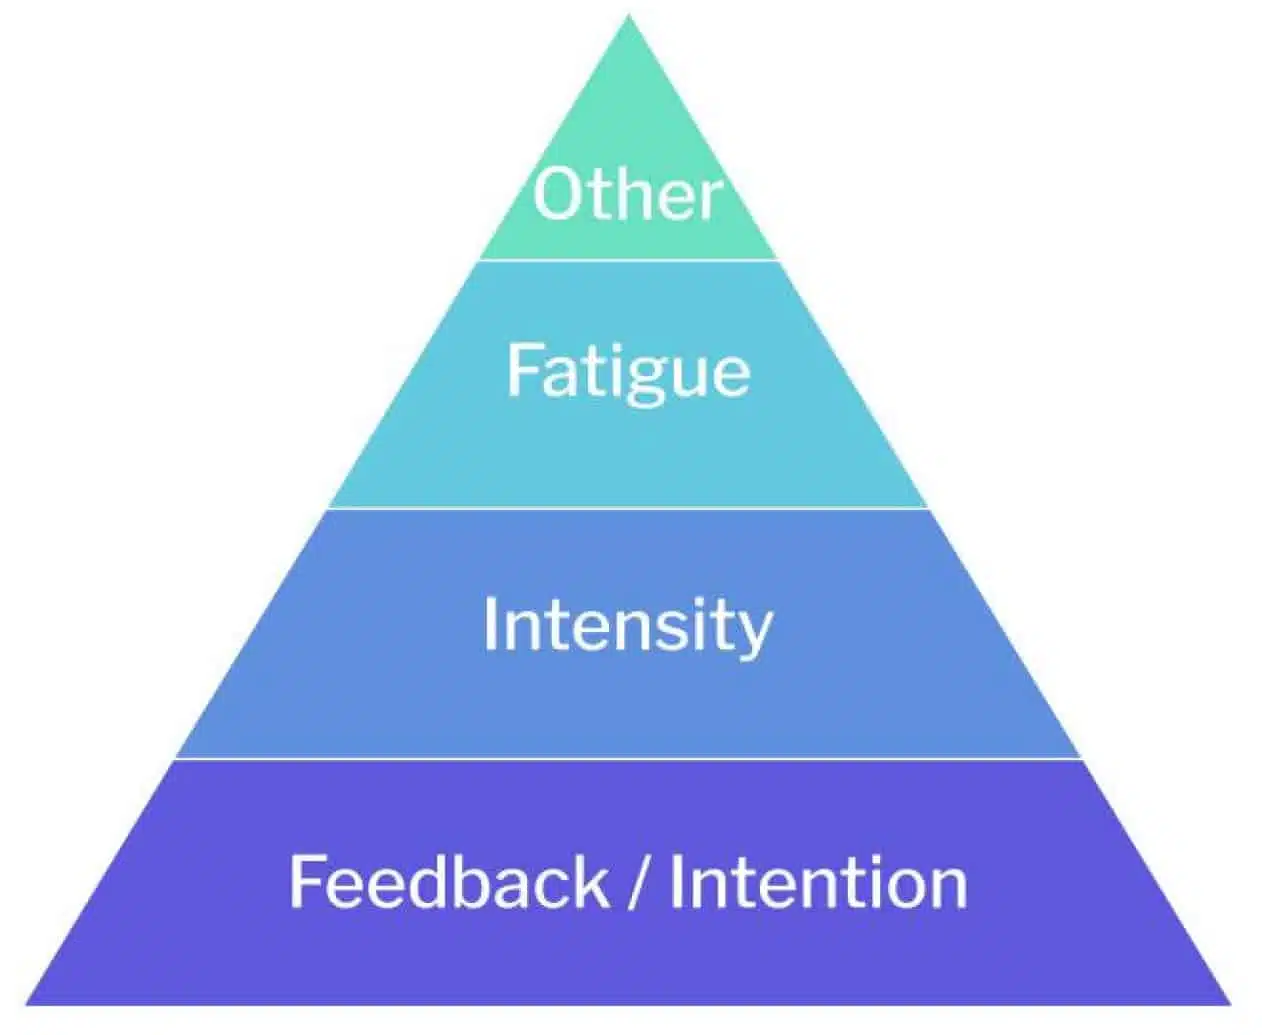
As we can see in the following pyramid, in Vitruve, we consider that the most important part is feedback, as the benefit it provides in relation to the time invested is very high. That’s why the first step would be to start providing feedback to the athletes.
If we have an encoder, we simply need to place it in front of the athlete so they can see or hear the velocities while they are performing the lifts. Additionally, we should try to motivate them to always try to lift faster than the previous velocity. But even if we don’t do that, knowing the velocity of each repetition will likely encourage them to surpass it. And, as we’ve seen throughout the guide, applying more speed will lead to greater strength gains.
Adjusting The Intensity
This involves adjusting the weight that athletes place on the barbell. For us, this second step is important because, generally, individuals who come from traditional training programs are accustomed to working with percentages of their 1RM (One Repetition Maximum). Therefore, the easiest approach is to take those percentages and simply use the VBT linear encoder or a barbell tracker to estimate the daily 1RM.
This way, we don’t need to make many changes in our programming, but we can determine our athletes’ 1RM each day, which can vary significantly from one training session to another.
Here, we detail three methods for adjusting intensity, and you can use the one you prefer. As a general rule, if you’re working with one athlete at a time, the load-velocity profile can be a good option. On the other hand, if you’re working with multiple athletes simultaneously, speed zones might be a better choice.
Using The Default Equations Provided By The App
The simplest approach is to use the default equations provided in the application, which have been extracted from scientific studies. With each lift the athlete performs, they will have an estimated 1RM, allowing us to adjust the weight to the planned training percentage for each day. Thanks to this, we can determine their 1RM every day without actually lifting it, estimating it with the encoder.
Creating a Unique Load-Velocity Profile
In the event that the default equations available in the application do not work well for our athletes, we can create a load-velocity profile for each of them. If we have many athletes, and we’re unsure if it will be effective, we can start with one or two to see how it estimates their 1RM and how the profile turns out. If it works well, we can then apply it to the rest of them.
However, if the generic equations are working fine for us, there’s no need to invest time in creating load-velocity profiles, especially if we have limited time available.
Velocity Zones
If for any reason, you’re not used to working with percentages, another alternative is to work with speed zones. As we’ve seen throughout the guide, this involves instructing the athlete to seek a weight they can move at a specific velocity instead of prescribing a percentage of their 1RM. For example, instead of telling them to train at 80%, we can instruct them to find a weight they can lift at 0.7 m/s.
Since velocity is directly related to the percentage of 1RM, saying 80% or 0.7 m/s is essentially the same thing. The difference is that we’re using velocities instead of percentages.
Fatigue Control
Knowing the intensity and being aware of the athlete’s fitness level, whether by estimating their daily 1RM or working with speed zones, the next step is to monitor the fatigue the athlete is accumulating in each set. As we’ve seen in various scientific studies, working with more than a 20% or higher level of fatigue is not better and can even be counterproductive. Not only will they not gain more strength, but they can also lose it, impairing their performance in their specific sport and increasing the risk of injury.
For this reason, it’s ideal to always work with a level of fatigue below 20%, specifically between 5% and 20%, depending on the weekly frequency, training sessions, the athlete’s condition, and their progress. For example, if we observe that a 10% fatigue level allows for good recovery and improvement, we can stick to it, but we can also vary between roughly 5% and 20%.
If you have a VBT encoder, you can adjust the velocity loss percentage within the application so that, in each set, when the athlete’s velocity has decreased by 10% or 15%, it notifies us to stop.
Best Velocity Based Training Devices – Full Review 2025
Another alternative for fatigue control is working with speed zones. However, if this system seems complicated, you can work by estimating the daily 1RM and using the velocity loss percentage.
By knowing the exact percentage of fatigue, monitoring velocity, and fatigue, you would be practically implementing VBT in its entirety.
[starbox]