8 de November de 2020
5 Testing Procedures Every Coach Should Master
Testing and data collecting are cornerstones of both sports coaches and scientist. During the last decades growing technology made testing simpler than ever. However, having the latest state of the art gadget does not equals getting the right data and improving the decision-making process to improve training programs.
I´m a big fan of Nassim Taleb and in several of his books he pointed out the term “Lindy Effect” but the origin of the term can be traced back to Albert Goldman´s article in 1964 title “Lindy´s Law” referring to a place where comedians gathered together and “conduct post-mortems on recent show business ‘action’“.
The Lindy effect is a theory that the future life expectancy of some non-perishable things like a technology or an idea is proportional to their current age so that every additional period of survival implies a longer remaining life expectancy. Where the Lindy effect applies, the mortality rate decreases with time.
So, testing procedures are in fact non-perishable things. So, chances are that the longer the test has been around, the longer life expectancy it will have. The reason I’m pointing this out it’s because it’s easy to get lost in shiny new stuff and even discredit old ones just because they are outdated. But don´t get me wrong, I´m not neglecting the value of technology, a couple of years ago having a force plate or a lineal position transducer in a gym was unthinkable. Nowadays, it’s getting more and more popular every day. Nevertheless, we need to realise that with a force plate, LPT, jump matt or whatever gadget the market came up in the future the non-perishable thing is the jumping protocol
Good data helps drive better decisions, and the precision, accuracy, and repeatability of that data need to be at a standard that renders it trustworthy. At the end of the day, it does not matter if you have the best facility equipped with the best technology in the world because the limiting factor depends on human resources (athletes and coaches or scientists). If the athlete does not give a f**k, the data collected has no value and the same applies to mistakes done by the person in charge of collecting the data. In fact, most issues with data collection are attributable to mistakes during the testing protocol.
Moreover, getting reliable and valid data should guide the decision-making process and help to adjust the program. So, if you are not using the data to improve your coaching process, don´t waste your time nor your athlete´s. Nevertheless, if you decided to implement a given test it’s mandatory to be completely honest, as the goal should be to see change and communicate the truth, not necessarily improvement or feeding anyone ego. Data MUST be blind and devoid of bias.
Common Factors Behind Testing Errors
Even though each testing protocol has its own specific consideration that needed to be addressed in order to avoid mistakes, every data collecting procedure must take into account repeatability, reliability and validity.
- Reliability: Reliability is the ability to reproduce a consistent result in time and space, or from different observers, presenting aspects on coherence, stability, equivalence and homogeneity. If reliability is high, measurement errors are small in comparison to the true differences between subjects, so that subjects can be relatively well distinguished (in terms of the quantity being measured) on the basis of the error‐prone measurements1,2.
- Repeatability: Repeatability of measurements refers to the variation in repeat measurements made on the same subject under identical conditions3. This means that measurements are made by the same instrument or method, the same observer and that the measurements are made over a short period of time, over which the underlying value can be considered to be constant. Variability in measurements made on the same subject can then be ascribed only to errors due to the measurement process itself1,2.
- Validity: Validity is simply asking if the test actually measures what it is supposed to measure. Or from a more practical point of view if the result would contribute to getting better at a Key performance indicator2.
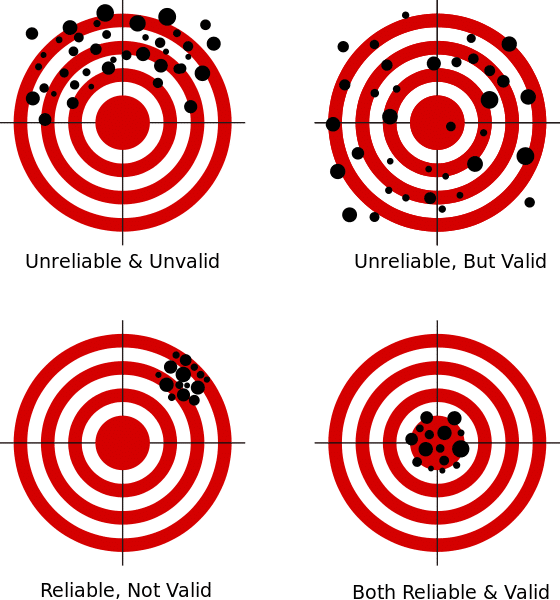
Figure 1 Different combinations of Validity and Reliability.
So, to sum this up we need a test and a testing protocol which measures what it is supposed to measure with high precision, with a small error that allows us to be confident with the results and that change can be detected meaningfully enough completely devoid of bias. Consistency with the protocol is KEY (warm-up, familiarization, activation, etc).
Explosiveness/Power Test
Jumps and throws are a simple, practical, valid, and very reliable measure of strength and power for the upper and lower body respectively.
Countermovement Jump (CMJ)
CMJ is one of the most popular tests used by coaches all around the world. it´s mainly designed to assess lower-body vertical power performance4. It can be performed with or without the help of the arms (arm-swing) which it has been shown to increase jump height by 10% or more5.
The test can be performed using a different kind of devices such as force plates (gold standard)6, contact mats7, Lineal Position Transducers8, Accelerometers9 and video analysis10. And, of course, depending on the equipment used the variables will be different.
Testing Procedure.
- Whatever device and method you are using, be sure to set up the equipment properly and calibrate it if it needs it (some force plates needs calibration before using it).
- Decide if the test will be done with or without the arm-swing. If the arm-swing is not permitted, athletes must keep their hands on the hips throughout the test (PAY ATTENTION TO THIS).
- Standardize CMJ Depth. Even though there is no one size fits all depth and researcher have not come to an agreement on the most appropriate CMJ depth, be aware that changes in the eccentric action can and will affect concentric power output. So, be sure athletes are consistent with the depth of the eccentric phase.
- Be sure that during the flying phase athletes extend hips, knees and ankles to avoid additional flight time (which would affect the estimation of the jump height) especially when the method is chosen uses flight time to calculate jumping height.
- One of the most common mistakes happens during landing. It´s crucial that the athlete lands in the same spot as they took-off (marks in the floor could be useful). Also, as the last floor contact is done with the toes, it´s important to be sure that the first body part that touches the floor (or device) are the toes as well. A quick fix for this is to ask the athlete to perform a second jump immediately after landing.
- It´s advisable to perform a minimum of three attempts and be sure athletes are doing it with maximal intent.

Broad Jump
The Standing long jump, also called the Broad Jump, is common and easy to administer the test of explosive leg power. It is one of the fitness tests in the NFL Combine. The standing long jump was also once an event at the Olympic Games11,12.
Testing Procedure.
- The athlete stands behind a line marked on the ground with feet slightly apart. A two-foot take-off and landing is used, with the swinging of the arms and bending of the knees to provide forward drive. The subject attempts to jump as far as possible, landing on both feet without falling backwards.
- The measurement is taken from take-off line to the nearest point of contact on the landing (back of the heels).
- A long jump landing pit is sometimes used instead of a hard surface, which enables the subject to confidently put more effort into the jump, and to extend the legs further in front of the body for landing. This technique also allows those with greater skill to score longer jumps, which is undesirable if you are trying to test for leg power only.
- Falling or stepping backwards after the landing will result in measurement to that point of contact rather than where the feet first touched.
- Be aware that some subjects will try to use a step at take-off, which is not allowed.
- It´s advisable to perform a minimum of three attempts and be sure athletes are doing it with maximal intent.
Reactive Strength Index (RSI)
The original testing procedure for RSI as a way of measuring fast Stretch shortening cycle (SSC) ability proposed by Young included an Incremental Drop Jump (DJ) procedure which consists of a DJ from a variety of drop heights (30, 45, 60cm) To impose various stretch loads on the leg extensors. A contact mat /computer system was used to record jump height and contact time13.
The index is actually a ratio between two variables which in mathematics, indicates how many times one number contains another. We use ratios to make comparisons between two things, in this case, we are comparing the jump height (expressed in Centimeters) with the contact time (expressed in seconds), which is basically the amount of time an athlete is touching the floor in between jumps because RSI is usually calculated from Drop Jumps14,15.
However, with the recent advance in sports performance technology such as linear position transducers, portable force plates, etc., we can calculate RSI for non-plyometric jumps such as CMJ, using the time to take-off instead of Contact Time which includes the time needed for performing the eccentric and concentric phases of the stretch-shortening cycle14.
RSI can be tested in different ways (Squat Jumps; Tuck Jump; CMJ; Loaded CMJ (Dumbbells with 30% 1RM); Single-Leg Jump, Repetitive Jumping Protocols or the most popular one using Drop Jumps)14. We are gonna focus on the Incremental DJ-RSI test.
The drop jump also called the depth jump or box jump is a fitness test of leg strength and power which requires the athlete to “drop off” a box and immediately jump as high as they can. There is also an Incremental Drop Jump test used for measuring reactive leg strength, where the athlete jumps after dropping from a series of different heights.
RSI Testing Procedure.
- The heights used can be between 20 cm and 100 cm.
- The test is supposed to end once the athlete contact time is greater than 250ms.
- Decide if the test will be done with or without the arm-swing. If the arm-swing is not permitted, athletes must keep their hands on the hips throughout the test (PAY ATTENTION TO THIS).
- The athlete stands on the box, adjacent to the timing mat or force plate. The athlete then drops down off the box, bending the knees on landing, then immediately performs a maximal vertical jump.
- It´s advisable to perform a minimum of three attempts and be sure athletes are doing it with maximal intent.
- One of the most common mistakes is jumping off the box rather than simply ‘stepping-off’.
- To calculate RSI There are three common methods
- 1: RSI = Jump Height / Ground Contact Time
- 2: RSI = Flight Time / Ground Contact Time
- 3: RSI = Jump Height / Time to Take-off
Acceleration and Top Speed Test
Sprint or speed tests can be performed over varying distances, depending on the factors being tested and the relevance to the athlete’s sport. The aim of all speed tests is to cover the set distance a fast as possible. The Shorter the distance the greater enfasis on the acceleration phase of the sprint and as the distance increases, the more top speed oriented will be the test. It is well known that elite sprinters accelerate continuously through at least 50m during a 100m sprint event16,17. On the other hand, sprint distance in team sport athletes are usually between 15 and 20m and it has been shown they achieved maximum speeds around 40m when performed from a static standing start and 30m from a flying-start18–20.
For testing sprint both radars and timing gates have been proven to be reliable assessment devices. However, the distance from the start-line, starting position, and the height of the timing gates have all been shown to affect the test results. Thus, it is important to be consistent in these to avoid testing error21–24.
Sprint Tests (varying distances)
Both 5 and 10 meters test are simple and easy to implement tests used to to measure an athlete’s accelerative capacity. More specifically, both are primarily used to measure athlete’s linear acceleration. Short srpints are usually measured from a static starting position to maximum speed in a straight-line over a 5m or 10m distance.
For testing top speed a variety of distances can be implemented from 20m to 60m as we explained before. However, when testing top speed we can choose between a static start or a flying one. in my experience, with team sports athletes the best choice from a risk-benefit stand point using a 30m flying test. On the other hand, with elite sprinters and track and field athletes it would be better to choose between 50 and 60m.
The distance between the start-line and the first timing gate has been shown to affect sprint times because a greater distance allows athletes to generate more speed. So, it is recommended that the starting line is placed 30cm behind the timing gate21. Moreover, the height of the timing gates has also been shown affect the results. Therefore, it is mandatory to take it into account and standarize it in the protocol used22. Finally, surface and weather conditions may affect resutls as well. Be sure to ALWAYS test on the same surface (grass, track, etc); and with the same conditions (cleats, boots, running shoes).
- Both split stance and standing stance are allowed. However, participantes should be intructed to always uses the same starting stance.
- False Steps or any other step should be avoided.
- Athlete must accelerate maximally till reaching the finish line. Some athletes begins to deacelerate before reaching the finish line, to avoid this a cone or a mark a couple of meter after the finish line could be placed as a reference to start breaking.
- It´s advisable to perform a minimum of three attempts and be sure athletes are doing it with maximal intent separated by a 2-3 minute rest.
If you have any questions, don’t hesitate to ask! Leave a comment or contact us here.
Bibliography
1.Bartlett, J. W. & Frost, C. Reliability, repeatability and reproducibility: analysis of measurement errors in continuous variables. Ultrasound in Obstetrics and Gynecology 31, 466–475 (2008).
2.Jovanovic, M. Statistical Modelling for Sports Scientists: Practical Introduction Using R (Part 1). (2019) doi:10.31236/osf.io/dnq3m.
3.Possolo, A. Introducing aSimple Guidefor the evaluation and expression of the uncertainty of NIST measurement results. Metrologia 53, S17–S24 (2015).
4.Markovic, G., Dizdar, D., Jukic, I. & Cardinale, M. Reliability and Factorial Validity of Squat and Countermovement Jump Tests. The Journal of Strength and Conditioning Research 18, 551 (2004).
5.HARMAN, E. A., ROSENSTEIN, M. T., FRYKMAN, P. N. & ROSENSTEIN, R. M. The effects of arms and countermovement on vertical jumping. Medicine & Science in Sports & Exercise 22, 825 (1990).
6.Enoksen, E., Tønnessen, E. & Shalfawi, S. Validity and reliability of the Newtest Powertimer 300-series® testing system. Journal of Sports Sciences 27, 77–84 (2009).
7.García-López, J. et al. The Validation of a New Method that Measures Contact and Flight Times During Vertical Jump. International Journal of Sports Medicine 26, 294–302 (2005).
8.Wadhi, T., Rauch, J., Tamulevicius, N., Andersen, J. & De Souza, E. Validity and Reliability of the GymAware Linear Position Transducer for Squat Jump and Counter-Movement Jump Height. Sports 6, 177 (2018).
9.Nuzzo, J. L., Anning, J. H. & Scharfenberg, J. M. The Reliability of Three Devices Used for Measuring Vertical Jump Height. Journal of Strength and Conditioning Research 25, 2580–2590 (2011).
10.Balsalobre-Fernández, C., Tejero-González, C. M., del Campo-Vecino, J. & Bavaresco, N. The Concurrent Validity and Reliability of a Low-Cost, High-Speed Camera-Based Method for Measuring the Flight Time of Vertical Jumps. Journal of Strength and Conditioning Research 28, 528–533 (2014).
11.Bennett, S. Testing and Evaluation; Protocols and Use, Part 1. Strength and Conditioning Journal 30, 39–41 (2008).
12.Bennett, S. Testing and Evaluation; Protocols and Use, Part 2. Strength and Conditioning Journal 30, 66–67 (2008).
13.W. Young. Laboratory strength assessment of athletes. in (2006).
14.Ebben, W. P. & Petushek, E. J. Using the Reactive Strength Index Modified to Evaluate Plyometric Performance. Journal of Strength and Conditioning Research 24, 1983–1987 (2010).
15.Flanagan, E. P. & Comyns, T. M. The Use of Contact Time and the Reactive Strength Index to Optimize Fast Stretch-Shortening Cycle Training. Strength and Conditioning Journal 30, 32–38 (2008).
16.Nagahara, R., Matsubayashi, T., Matsuo, A. & Zushi, K. Kinematics of transition during human accelerated sprinting. Biology Open 3, 689–699 (2014).
17.Brown, T. D. & Vescovi, J. D. Maximum Speed. Strength and Conditioning Journal 34, 37–41 (2012).
18.Spencer, M. et al. Time–motion analysis of elite field hockey, with special reference to repeated-sprint activity. Journal of Sports Sciences 22, 843–850 (2004).
19.Andrzejewski, M., Chmura, J., Pluta, B., Strzelczyk, R. & Kasprzak, A. Analysis of Sprinting Activities of Professional Soccer Players. Journal of Strength and Conditioning Research 27, 2134–2140 (2013).
20.Gabbett, T. J. Sprinting Patterns of National Rugby League Competition. Journal of Strength and Conditioning Research 26, 121–130 (2012).
21.Altmann, S. et al. Different Starting Distances Affect 5-m Sprint Times. Journal of Strength and Conditioning Research 29, 2361–2366 (2015).
22.Cronin, J. B. & Templeton, R. L. Timing Light Height Affects Sprint Times. Journal of Strength and Conditioning Research 22, 318–320 (2008).
23.Altmann, S. et al. Accuracy of single beam timing lights for determining velocities in a flying 20-m sprint: Does timing light height matter? Journal of Human Sport and Exercise 13, (2018).
24.Cronin, J. B., Green, J. P., Levin, G. T., Brughelli, M. E. & Frost, D. M. Effect of Starting Stance on Initial Sprint Performance. The Journal of Strength and Conditioning Research 21, 990 (2007).